
Last updated on June 26th, 2022 at 11:41 am
Prestashop is a well-built e-commerce platform, but it doesn’t come without some weaknesses. If your hosting provider doesn’t have good security practices in place, then it could be quite frustrating to have your e-commerce contact page exploited by hackers. Such intruders may try to send emails to hundreds or even thousands of email accounts around the world taking advantage of that Prestashop ‘bug’. This can lead to high resource usage, blacklist of your server’s IP, and so forth.
If your site is hosted by companies such as Bluehost or iPage, most probably you’re not going to need to implement reCAPTCHA on your site. These hosting providers take security seriously. And in most of the cases they’re going to block the spammers before they access your site.
But if your hosting provider doesn’t bother, then keep reading.
To stop email spam generated from Prestashop’s Contact Page, follow these steps:
Prerequisites
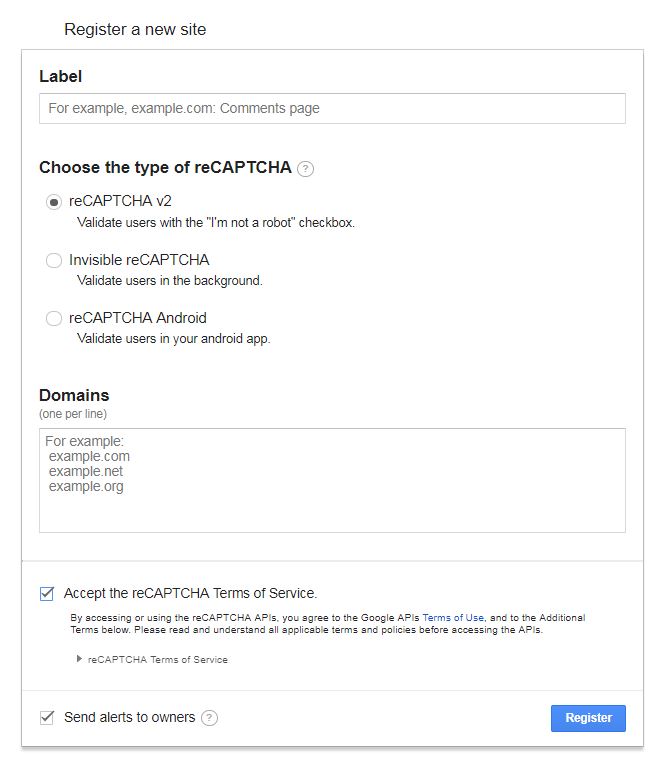
- Start with generating your unique reCAPTCHA Key here: https://www.google.com/recaptcha/admin
- Enter the domain names that you want to use this instance of reCAPTCHA with.
- Choose reCAPTCHA v2.
This information is always available on your Google Webmaster account.
- Locate the file called contact-form.tpl which should be available in your current theme’s directory. For example, in public_html/themes/default-bootstrap
- Once you open that file, make sure that the class contact-form-box is already declared in the code.
Let’s assume you have the following line, not containing contact-form-box:
<form action="{$request_uri}" method="post" class="std animated bounceIn" enctype="multipart/form-data">
Then, be sure to make it look like this:
<form action="{$request_uri}" method="post" class="std contact-form-box animated bounceIn" enctype="multipart/form-data">
Implement the following two scripts in index.php and header.tpl
- Open index.php of your site. Note that there may be several index.php files in your public_html folders. Make sure you locate the one that corresponds to your Prestashop installation.
- Right after the License part of the file, and before the first line of PHP code after the License, paste the following code:
if (isset($_REQUEST['submitMessage'])) {
if (empty($_REQUEST['g-recaptcha-response'])) {
sleep(25);
die('not human');
}
$opts = array('http' =>
array(
'method' => 'POST',
'header' => 'Content-type: application/x-www-form-urlencoded',
'content' => http_build_query( $post =
array(
'secret' => 'XXXXX-your-secret-key-XXXXX',
'response' => $_REQUEST['g-recaptcha-response'],
)
),
),
);
if (in_array(ini_get('allow_url_fopen'), array('On', 'on', '1'))) {
$stream = stream_context_create($opts);
$captcha = @json_decode(file_get_contents('https://www.google.com/recaptcha/api/siteverify', false, $stream), true);
}
elseif (function_exists('curl_init')) {
$curl = curl_init();
curl_setopt_array($curl, array(
CURLOPT_RETURNTRANSFER => 1,
CURLOPT_URL => 'https://www.google.com/recaptcha/api/siteverify',
CURLOPT_POST => 1,
CURLOPT_POSTFIELDS => $post,
)
);
$captcha = @json_decode(curl_exec($curl),true);
curl_close($curl);
}
else {
// buggy hoster !
$captcha = array('error' => 'buggy hoster');
}
if (empty($captcha['success'])){
if(!empty($_SERVER['HTTP_REFERER'])) {
sleep(5);
die('<p>Captcha Invalid</p><a href="'.$_SERVER['HTTP_REFERER'].'"><button>Go back to the form</button></a>');
}
sleep(25);
die('Please prove that you're a human!');
}
}
</pre>
In that code, make sure you replace XXXXX-your-secret-key-XXXXX with your Google reCaptcha Secret Key. This key is needed in order to enable communication between your site and Google. Save the changes.
- Next, locate your theme’s header.tpl file and paste the following code just before the </head> tag:
<!-- Google ReCaptcha on contact form -->
<script>
(function(){
var googlecaptchasitekey = 'XXXXX-the-Site-Key-XXXXX';
var trigger = function(){
setTimeout(function(){
$('div.g-recaptcha').remove();
var $forms = $('form.contact-form-box,form#sendOrderMessage');
if ($forms.length > 0){
var captcha = $('<div class="g-recaptcha" data-sitekey="'+ googlecaptchasitekey + '">');
var $submit = $forms.find('#submitMessage,.button[name=submitMessage]');
$submit.before(captcha);
$submit.click(function(event){
if ($forms.find('#g-recaptcha-response').val().length == 0) {
event.preventDefault();
event.stopPropagation();
return false;
}
});
try {
window.grecaptcha.render(captcha[0]);
} catch(e){};
}
},1000);
};
$(document).ready(trigger);
$(document).bind('ajaxComplete', trigger);
})();
</script>
{if !isset($language_code)}{assign var="language_code" value=$lang_iso}{/if}
<script src="https://www.google.com/recaptcha/api.js?hl={$language_code}"></script>
<script>
if ( window.history.replaceState ) {
window.history.replaceState( null, null, window.location.href );
}
</script>
- Next, replace XXXXX-the-Site-Key-XXXXX with your actual Google Captcha Site Key. Save the changes.
Now, if you visit your site’s Contact Form page, you will notice the Google reCaptcha module. it should look more or less like this:

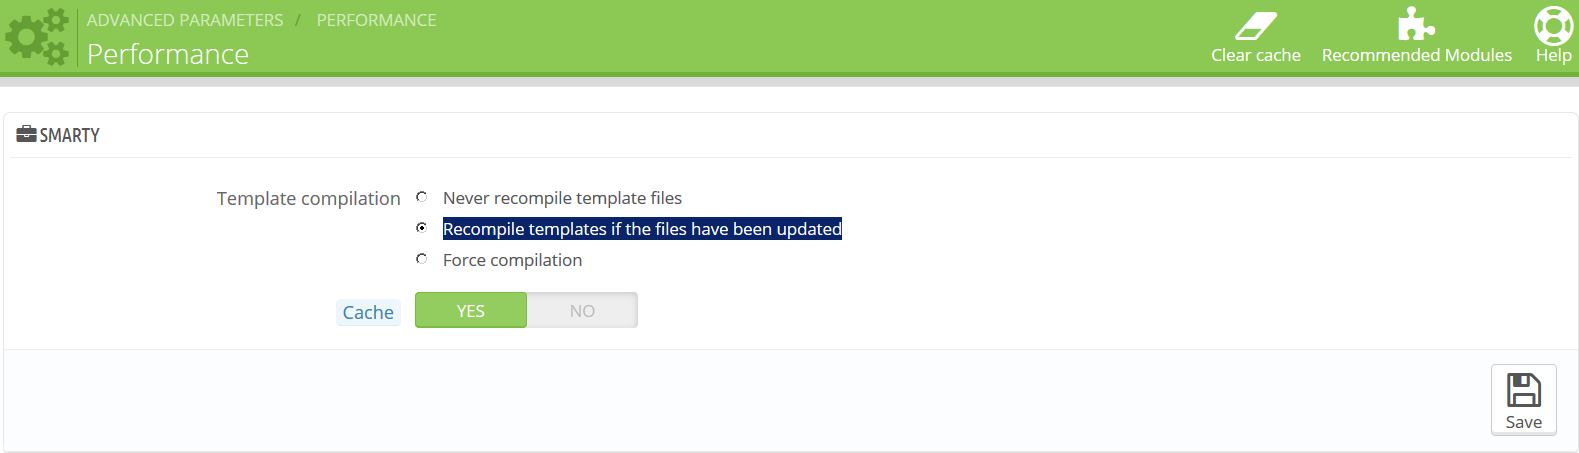
If you don’t see it, be sure to also clear your Prestashop Cache from Advanced Parameters -> Performance -> Recompile templates if the files have been updated -> Save. Then click on Clear Cache.
Congratulations! You’ve successfully implemented Captcha in Prestashop!
Additional information suggested by some Prestashop gurus:
- Some sites keep redirections of controllers at the root following major updates of versions. In this case you must copy exactly the same code that is in index.php into the file contact-form.php that is in the root of the site.
- For Prestashop 1.4 versions the PHP code does not go in index.php. Instead, it goes in the files contact-form.php and order-detail.php.
Cheers!