Last updated on June 27th, 2022 at 12:59 am
For free, no technical knowledge required.
The purpose of this guide is to help beginners and newbies who want to create their first website. The easiest step by step guide on how to make a website is here!
WordPress is one of the most (if not the most) intuitive and easy to use web site building platforms that exist currently.
I recommend WordPress to every website beginner because it’s the best website builder for professional websites.
✅ My step-by-step tutorial on how to get a fully functional WordPress site in 30 minutes starts with an overview of the available content management systems (CMS).
✅ We will go through the process of selecting the right domain name for the site
✅ Then we will have a look at the process of choosing the right hosting service for the site, install a theme, plugins and tune the look and feel of your new site.
The guide was created from my own personal experience with building websites for my customers throughout the years. It’s divided into three parts:
- Decide on the platform of your site
- Select a domain name for your site. Then Choose a web hosting service.
- Install and configure your new website
Decide on the platform of your site
Back in the days, learning code was essential in order to create your own website.
Today, there are many CMS platforms that provide you the option to build your own professionally looking site without the need of learning code.
Techcrunch’s article on why you shouldn’t learn code is quite self-explanatory.
Even if most of the sites today are built using code such as PHP, HTML and CSS, these take a lot of time for a beginner to start using them for web development.
Thankfully, in 2017 there’s no need to learn code anymore as there are plenty of content management systems that do the coding for you automatically.
CMS stays for Content Management System, but what does that mean and is it free to use?
What is a CMS and why you should consider using it instead of building everything from scratch?
Well, these days everyone talks about different CMS platforms and basically a CMS is a content management system. What does that mean?
Let’s say that you want to start a blog or just a website that you want to use to showcase your products and your services. One way to go about it is of course building everything from scratch using HTML, CSS and JavaScript, building the database, building all the administration kind of interfaces, so you can log in and update the information on your website.
It’s obvious why we need an admin panel – because random users and visitors wouldn’t be able to mess with the data on the website and change it. So that’s one reason that you need an admin platform, so that only authorized people can go ahead and edit it.
Another reason would be of course you can set up a website if you are software engineer or web developer, but that website wouldn’t be really easy to use to the general public.
So if you’re building for someone who is not familiar with technology, you better use a proven CMS because a content management system provides all the tools to manage users, to manage content, to apply beautiful ready layouts to your website.
There are CMS platforms out there designed for web applications and there are content management systems available for general website or web blog users. Some of the famous CMSs out there which you might have already heard of could be WordPress, Joomla, Drupal or Magento.

Which CMS Platform should I use to make a website?
Currently, the most used content management systems used for building websites are:
- WordPress: According to
w3techs.comWordPress is number one content management system used by almost 29% of all websites. According toBuiltWith.com, WordPress has a 31% share which makes it #1 website platform meaning that more than 15,000,000 websites use WordPress. - Joomla: Similarly to WordPress, Joomla is a free CMS platform. However, its website market share is around 3,3% of the websites on the web.
- Drupal: With its 2.3% market share, Drupal is the 3rd CMS of choice. Its considered the web site building platform for advanced users with in-depth technical and programming skills.
- Magento: It’s the CMS used for high traffic online stores, but due to its complexity, it’s only used by 1.2% of the websites online.

You can find more information about the differences between WordPress, Joomla and Drupal here.
My personal advice is to build your website with WordPress, but if you’re still willing to invest time and efforts in learning code and advanced technical skills, you can follow my tutorials on building websites with Joomla, Drupal and Magento.
WordPress – the most recommended and easy to use website building platform
WordPress is a very powerful content management system especially in terms of structure.
Nowadays, the easiest way to build your website is by using WordPress because:
- WordPress is open source meaning that it is absolutely FREE
WordPress can be installed for free. As it is an open source CMS, this means that its monthly updates are for free too.
It’s been kept updated and there are plenty of plugins. WordPress has the biggest developer community which guarantees fast response to any possible issues.
- WordPress is both robust and versatile
You can find plugins for basically anything – if you want to add social features to your blog or your website, you can find plugins to do that for you. If you want to capture leads, there are plugins to do that as well. There are plugins to build membership areas for your users.
Another powerful side of WordPress is that it has so many themes out there. If you want to change the look of your website, you just go ahead do a Google search and you will find plenty maybe even tens of thousands of different themes out there that are absolutely free.
So another advantage of WordPress is the theme side of it and the ability to change the look event with the least amount of effort and energy.
- WordPress makes it obsolete to learn programming languages such as HTML and PHP.
WordPress is made for those who want to spend their time on the content of their sites instead of messing around with the code on the site.
The Simplicity of WordPress
Using WordPress is just like using an advanced text editor such as Microsoft Word or Apple Pages – you just put the content on your pages like text, images and publish your content with a click of a button.
On top of that, your site looks just as great as any other websites built on WordPress such as the site of Beyonce, Bloomberg Professional, Chicago Sun Times, The Walt Disney Company, The Official Star Wars Blog, Sony Music, MTV News and many more.
My advice is to go with WordPress for your first self-hosted website.
Speaking from my own experience, WordPress has it all – it is simply ideal for small business websites to even big corporate websites.
To get started with your first WordPress website, you will need a domain name for the site.
Once you choose the name of your site, you will need to get the right hosting space where you will be able to install your WordPress site and start building it.
If you need help with setting up your own WordPress site, let me know. I will be happy to share my website building experience with you.
Select a domain name for your site. Then Choose a web hosting service.
There are two basic requirements for every single website (no matter if it’s WordPress or not) in order for it to be up and running.
- 1. The first requirement is to choose a domain name for the site. That is the name that your visitors will use in order to uniquely identify your site. For instance,
mycoolwebsite.com
Depending on the type of domain name you choose for your site, it can cost you between $0 and $15 a year.
There’s an option for a completely free domain name, but I won’t recommend using a free domain name such as mycoolwebsite.tk (yes, domain with a .tk extension) as they look a bit strange and perhaps aren’t cool for your brand building.
I’d advise you to stick with a .com domain as it’s just the industry standard for creating an online brand.
-
- 2. The second requirement is to choose a host for your website. The web hosting provider you choose is the one responsible for making your site available on the net.
The basic web hosting service itself costs no more than $5 dollars a month which is less than one fast food meal.
There are basically two types of hosting for WordPress beginners:
- Managed WordPress Hosting
- Shared WordPress Hosting
My recommendation is to go with a regular Shared Hosting as other advanced options such as Cloud Hosting and Dedicated Hosting can be too hard to manage for newbies, but such plans can be too expensive as well. Usually, the advanced hosting plans are suitable for already existing WordPress sites that need more resources.
Let’s Stick with the shared web hosting environment
The purpose of this tutorial is to help beginners getting started. So we will stick with WordPress Shared Hosting.
In conclusion, both domain name and web hosting are two inseparable prerequisites for a working website. While domain name is usually between $0 and $15 a year, web hosting can be around $2 to $5 a month which is the amount of less than one nice coffee at Starbucks.
Can I get both domain name and hosting at the same time?
The simple answer is yes. Actually, the best scenario is to get both domain and hosting at the same time.
That’s why my preferred hosting company is www.Bluehost.com as they offer both domain registration and web hosting services at the same place.
This means that there’s no need to purchase a domain name from one company and get a hosting space from another.
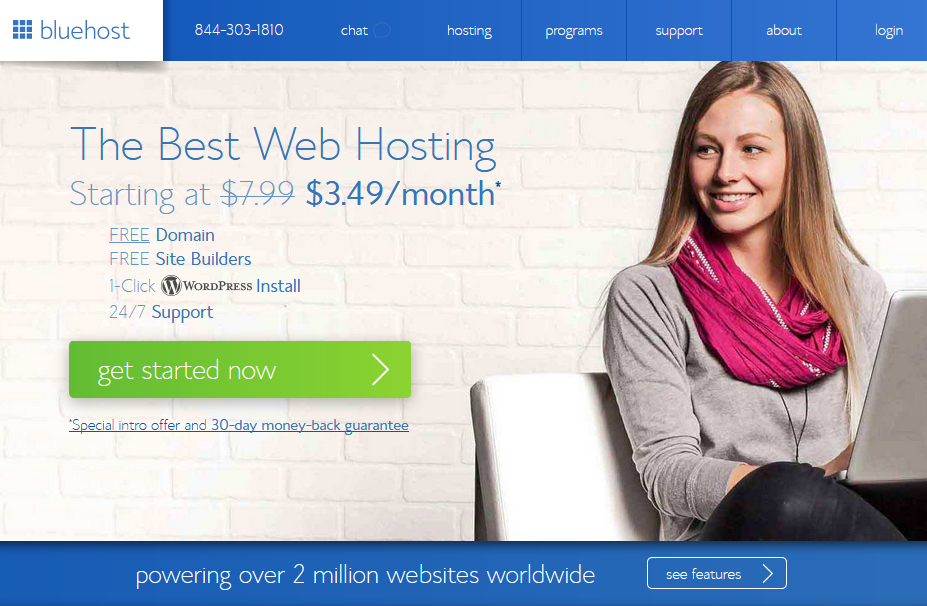
I used their services for me and my customers for more than 4 years now. Basically, I open a new account with them for every project related to WordPress, Joomla, Drupal or Magento.
In fact, every new hosting account I create with them is ready to be used as soon as I go through the registration process with them. Once you do this, you’re ready to install your preferred CMS with their one-click-installation tool.
Additionally, as soon as you register your account and domain name, you will be able to create your own professionally looking email addresses such as [email protected].
If you already have a domain name registered elsewhere, then feel free to go to the next step on Installing and configuring your new website.
Choosing the domain name for your site
If you’re ready to create your site with Bluehost, you can choose your domain name for free as they currently offer this promotion for their new hosting plans.

Some suggestions for choosing your domain name
-
- Explore what your online business brand will be about. It is important to chose a great domain name that you will continue to love even years down the road.
- Knowing what your brand is giving to other people, what are the top three words that they associate your brand with and what is your brand in general will help you select the right domain name for your business site.
A business site domain name usually looks like this: companyname.com
- If it is a blog or a personal website, try to think about what kind of topics will you cover on the site, who will be the reader and where do your readers work or spend your time in general.
A domain name of a personal website or blog usually looks like this: siteownername.com or bloggername.com.
There are some factors that are always valid no matter if your site is going to be a personal blog or a company website.
Make sure that your domain name is:
- Available
Thankfully, when you search for your domain name, the system will notify you automatically if your domain name is available for registration. When you’re searching for the perfect domain, make sure the name is specific enough.
- Niche Specific
Let’s say you’re a carpet cleaner in New York and the name of your company is ‘John’s Carpet Cleaning’. So CarpetCleaning.com or NewYorkCarpetCleaning.com will be too general. But if your company is operating in Bronx, then CarpetCleaningBronx.com would be much more relevant. So when your customers search for “carpet cleaning in Bronx”, most probably your site will get a boost on Google.
- Relevant
Try to be as much specific as you can when choosing a domain name for your site. If your site is going to be about carpet cleaning, make sure you include those two key words in your domain name.
- Easy to Remember and as shortest as possible
It is much easier to talk about something that is memorable and easy to remember in general. Try to get an easy to remember domain name that is as short as possible at the same time.
- Has a .com, .net or .org Domain Extension.
Recommendation
For example: mycarpetcleaningblog.org. If the .com version of your domain isn’t available, you can just go with a .net or a .org extension. However, some of your customers may type in .com by accident instead of typing .net or .org.
In terms of domain extensions (like .com, .org, etc.), just go with one of the usual ones. There are many new domain extensions such as .online, .today, .solutions, .life, .company or .pro.
My recommendation is to stick with .com, .net. .info or .org as these are the ones that became domain name extensions. However, if one of the newest extensions (such as .pro, .today, etc.) are the ones that perfectly suit your site, just go with that one.
Before we move to the next part of this guide, here are some things to have in mind:
Make sure you choose a reliable service for both web hosting and domain name. There are many hosts that provide these services, but the one I choose for me and my customers is Bluehost.com. Speaking from my own experience, it’s just one of the most reliable ones (if not the most reliable).
If you need more information on how to install WordPress on your preferred hosting plan with Bluehost, then have a look at my tutorial on choosing the right hosting for your site.
Install and configure your new website
You should now have a domain name and a hosting space for your site, if you followed the previous steps.
The last step is to install your site and make it reachable online. We just need to install WordPress for this.
Once WordPress is installed, it will be automatically associated to your domain name. So you will be able to reach your site by typing your domain name in the browser right after the installation.
Install WordPress automatically or manually?
The easiest way to install WordPress is by using a single click installer which installs the site automatically for you.
Another option is to download the installation archive of WordPress from wordpress.org and install the files manually.
I recommend the automatic WordPress installation as it is the easiest one.
Install WordPress automatically from your web hosting account
Most of the biggest hosting providers have their own single-click installers that can be used for installing the most famous content management systems such as WordPress, Joomla, Drupal, Magento, etc.
Every web hosting company uses its custom one-click-installer. For instance, Bluehost and SiteGround use Softaculous, GoDaddy uses Installatron and so on and so forth.
There isn’t any major difference between these one-click installers. They do basically the same thing – they help you install WordPress right away so you can start building your site.
Assuming that you managed to open a hosting account with Bluehost, you will be able to find the one click installer.
To install WordPress with a single click, go to your Bluehost’s cPanel and:
1. Locate the Website section and click on Install WordPress. If you have issues with finding it, make sure you check my guide on how to install WordPress at Bluehost.

2. On the Do it yourself (FREE) page, click on the Install button.

3. On the next page, you will have the option to choose your preferred website version.

You can choose from http://www.yoursite.com and http://yoursite.com, meaning that you can have a www version or a non-www version for your site. This is actually up to your own preferences and the version you choose has no impact on your site’s functionality. You can change the site version at a later stage if you wish.
4. Now the next screen is about your WordPress installation details. Here you will need to enter your administrator email for the installation, username and password for login in to your new WordPress website as an administrator. Then just click on I have read the terms and conditions of the GPLv2 and finally click on the Install green button.

5. Wait for the installation to complete. Once it’s done, you will notice an orange section on the top saying Your install is complete!

6. Click on the View Credentials black button in order to view your login credential for your WordPress site that has been just installed.

7. Now under ‘Step 1. Access your New WordPress site’ click on the Admin URL so you can log into your new website. Note that you can access the admin area of your site by simply adding /wp-admin to your domain name in the browser. For example, www.mycoolwebsite.com/wp-admin
My recommendation is to not click on any of the banners for browsing Premium Themes and Plugins on that page especially if you’d like to save some money.
Install WordPress manually from your web hosting account
On the next step, I will show you how to configure your newly installed WordPress site and how to choose a beautiful theme FOR FREE.
The manual process of installing WordPress was common in the early days of WordPress development as there weren’t any specifically designed one-click installers at that time.
With the rising popularity of WordPress throughout the years, the single-click installers became an industry standard for deploying a WordPress site on a hosting server.
My advice is to use an automated one-click installed as the manual installation of WordPress can be tricky for beginners. You can follow the steps from my guide on how to install WordPress manually.
Changing the default WordPress Theme for your new site
So far we managed to install a WordPress site for your domain name.
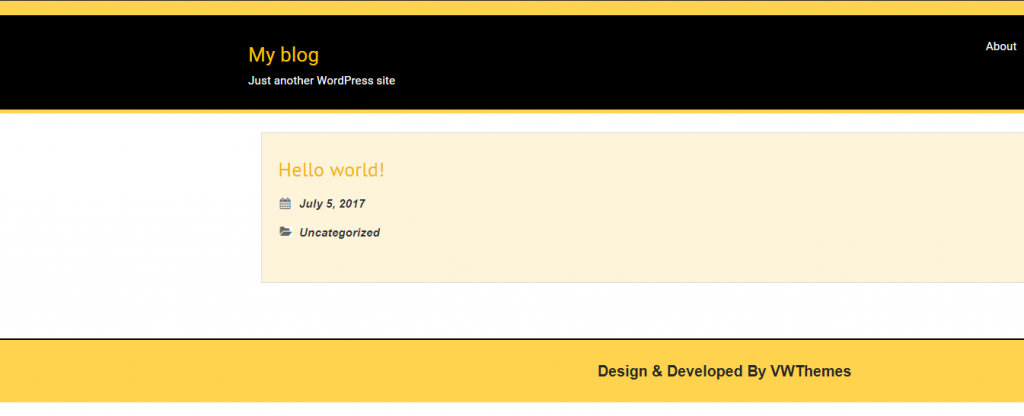
The coolest thing with WordPress is that it already comes with a default theme applied during the installation.
In order to check how your site looks like with the default theme, just visit your site from your preferred browser.

If you’re happy with your site’s default look, then go to the next step on How to add content to your site.
If you aren’t happy with the look and feel of the default WordPress theme for your site, then feel continue to read.
The power of WordPress is in its enormous database of free themes and plugins. You can choose from thousands of free themes that can help you find your site’s own look and feel.
Where to find FREE WordPress themes for my site?
To change your site’s default theme for free, follow these steps:
1. Access your newly installed site as an administrator. Let’s assume that your site is called yoursitename.com. To do this, you need to log in from yoursitename.com/wp-admin by using the same username and password that you have in Installation Credentials.
This is you WordPress Dashboard.

I know that it may be a bit stressful in the beginning, but I’m here to help and guide you. So let’s move on.
Select a free theme from WordPress Dashboard
You’re now in your Admin area or WordPress Dashboard.
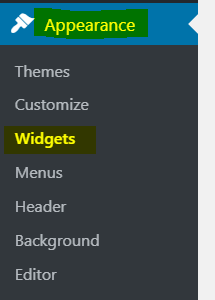
Now, in order to change your current theme with a new one, we need to go to Appearance > Themes.

You will notice the themes that were already installed automatically for your site during its initial setup. You can change the theme by hovering over any of the other themes on that page and by clicking on the Activate blue button.
The Live Preview option will give you the opportunity to take a look on how your site would look like if that other theme was active.
I don’t recommend to install a theme manually at this point. However, if you’re confident enough and would like to install a theme that you already have, follow these steps on installing a WordPress theme manually.
To install a new theme for FREE:
Go to Appearance > Themes > Add New.
One you click on the Add New button on top, you will have the Search themes box on the right.
1. Type in a keyword in the Search bar. For example, if you want to browse the themes recommended for restaurants, then type the keywords restaurant responsive to see the available themes.

I’ve also included the keyword ‘responsive’ because this will help you find the best restaurant themes that will also work on smartphones and tablets.
2. Select the theme that you like and click on the Install blue button.

Activate your newly installed theme
3. Now click on the Activate blue button to activate the theme for your site.

4. Go to yoursite.com to check the new look and feel of your site.
5. If you want to tweak its appearance even further, then go to Appearance > Customize

I advise you to have a look at my list of the most popular FREE WordPress themes.
If you’re still not satisfied with the FREE themes from that list, you can have a look at my top 10 premium WordPress themes. Another alternative is theme portals such as TemplateMonster.com.
My recommendation is to first stick with a free theme at least during the first few days. All free WordPress themes are really versatile and highly customizable. So I advise you to just give them a try and if you aren’t happy with any of the free plugins, then go ahead and feel free to purchase a premium theme for your site.
Add new pages and posts to your site
So far, we already installed a site for your domain and we activated a free theme for that new WordPress site.
Now the next step is to create pages for your site.
Pages and posts in WordPress are where you store your content such as text and images.
Let’s have a look at the most essential steps in building a web page with WordPress.
How to Add a Page to Your Site
Let’s assume that you want to create a Contact Us page just like the one I have on my site. To create such a page, follow these steps:
1. Go to your WordPress Dashboard and click on Pages > Add New.
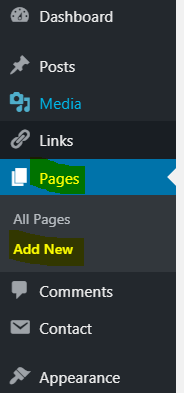
2. The next screen is titled Add New Page and there you will find a box called Enter title here. This is the place where you put the title of the page that you’d like to create.
In our case, we will call it ‘Contact Us’. Under the page title you will find a bigger box with two small tabs called Visual and Text. In there you can enter your page content such as text, photos, etc.

3. Once you’re done with your modifications there, you can hit the Publish button on the right to save and publish your new Contact Us page.

To check your newly created page, go to Pages > All Pages and you will find the Contact Us page in the list there.

If you want to include the Contact Us page in the menu of pages on your site, then continue to read.
How to Add a Page to Your Site’s Menu
Follow these steps to add your pages to the menu of your site:
1. Go again to your WordPress Dashboard and from the black sidebar on the left choose Appearance > Menus.

2. Now select the page you want to include in your site’s menu, click on the Add to Menu button so that it appears under Menu Structure. Make sure that Primary Menu or Home Page Header Menu is selected and click on the Save Menu or Create Menu blue button.

Congrats! You now have a site menu containing your Contact Us page. You can follow the same procedure for adding any other newly created page to your Menu.
How to Add a Post to Your Site
In fact, the difference between pages and posts in WordPress is not that big. They are quite similar.
If you’re going to have a blog on your site, posts would be the best decision to go with as posts on the same matter can be grouped in categories.
To create a new posts, go to your WordPress Dashboard and click on Posts > Add New.

The process is quite similar to the one for creating pages. You just need to choose a name for your new post in the box called ‘Enter title here’, under Add New Post.
Then you have the same big white box where you put the content of the post such as text or images.

You also have the option to group your posts in categories and assign them specific tags based on the keywords of the posts.
Additionally, you can add a Featured Image so that your post looks more appealing to your readers.
How to add a Post to Your Site’s Menu
The steps for adding a post to the menu of the site are similar to the ones for adding pages.
You just need to go to Appearance > Menus.
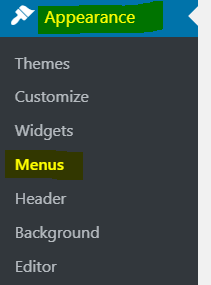
Then select the Post that you want to appear in your site’s menu and click Add to Menu.

If you don’t have a Menu yet, make sure you enter a name for your new site menu in Menu Name and click on Create Menu. Afterwards, you’re ready to add the post/page to the newly created site menu.
Add New Plugins to Extend Your Site’s Functionality
The power of WordPress is in the unlimited use of plugins. In short, plugins can provide additional functionalities and features to your site.
Honestly speaking, only the sky is the limit when talking about plugins. You can use a plugin for every single additional feature in WordPress.
Plugins can be used for simple tasks from displaying stock exchange information on your site to tweaking your site’s SEO settings or backup your site for example.
If you’re still not sure about what plugins are used for, then have a look at my article on what a plugin is.
To Add a New Plugin to Your Site, Go to WordPress Dashboard > Plugins > Add New
Once you access Plugins > Add New, you can type the keyword of the type of plugin you’re interested in.

As soon as you find your plugin, click on the Install Now button to install the plugin on your site. Once the plugin is installed, click on the Activate blue button to activate the plugin.
I recommend installing the following 5 plugins that in my opinion are the top must have plugins when starting a blog, an online store or just a regular website.
Plugins that I recommend
1. Yoast SEO plugin.
This is the plugin to use if you want your site to be more SEO friendly.
It helps you build your sitemap automatically, so that search engines like Google better understand your site’s structure and purpose.
It analyzes the content of your pages as you create it and gives you recommendations on its quality.
The coolest thing is that this plugin is FREE and it is currently used by more than 3 million WordPress sites.
2. Jetpack plugin.
Jetpack is used by more than 3 million WordPress sites so far and it is the plugin of choice when it comes to increasing WordPress security, traffic and engaging your readers at the same time. It provides traffic and SEO tools for free such as site statistics and analytics, automatic sharing of your content on social media.
It powers your site’s content by adding functionalities such as slideshows and galleries, sidebar customizations, fully customizable contact forms.
And my favorite one – it provides as FREE high-speed CDN (content delivery network) for the images on your site.
3. WooCommerce plugin. It is just the plugin to go if you’re going to sell any kind of products on your site.
WooCommerce is a universe of options and functionalities on its own. Combined with the unlimited power of WordPress, it’s able to transform your site in a top notch online store that provides both site administrators and store owners complete control.
This plugin is FREE and it now powers more than 3 million online stores, it has an enormous and fast growing online community that is there to help you.
If you want to create an online store, be sure to check our tutorial on how to create an online store with WordPress and WooCommerce vs Shopify and Oberlo.
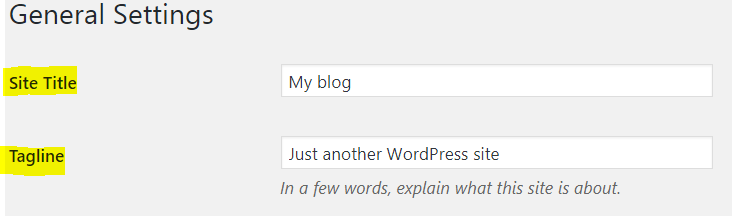
Changing the Site Title
The Site Title is a text that will appear on top of every page or post of your site.
The Tagline of your site is responsible for adding specific text at the end of every page and post on your site.
Each default WordPress installation comes with a standard site title which is ‘My blog’. This default text can be modified.
You can change the Site Title of your site from WordPress Dashboard > Settings > General.

On that page you will find a box called Site Title and another one called Tagline. Feel free to enter you own text there.
If you’re not sure about what to put for Site Title or Tagline, keep reading for more tips.
Using your domain name for the site title could be a good idea especially if you’re not planning to use a picture logo for your site.
The Site Title can contain the keywords of your niche, but my recommendation is to make them appear as a brand, so your website title looks more professional.
An even better idea is to use a more descriptive sentence for the Tagline explaining what your website is about. This can be very useful if you have a site motto or something similar that your can use to better promote your brand.
Having less text to read in the header of your site and leaving the Tagline empty is just okay.
Once you change the text for Site Title and Tagline, click on the Save Changes blue button.
To check the result, open a new tab and just visit your site’s homepage.
Configure a Static Home Page
By default WordPress is configured to show the latest 10 posts on its front page. This means that every time a visitor goes to your home page, they will see a blog-like page containing your latest posts.
To change this and switch to a static front page that stays the same all the time, do the following.
Make your Home Page a Static Page:
1. Go to WordPress Dashboard and click on Settings > Reading.

2. Choose A static page (select below).
3. For Front page, select the page on your site that you’d like to use as a front page.
4. For Posts page, select the page that you’d like to have your latest posts on.
Of course, you can leave the Posts page entry empty if you don’t want to have a specific page for all of your posts.
Configure the Sidebars of Your Site
Sidebars are used to display information that isn’t strictly related to the content on the pages of your site. This additional content is displayed with the help of Widgets.
Widgets are the actual content of a sidebar and they can be placed in the sidebar with a simple drag-and-drop.
Many themes offer the option to add sidebars on both sides of a page.
Sidebars are ideal for placing additional links, ads, images and more on your site without the need to change the content of the pages on your site.
However, for various reasons some website admins prefer to remove the sidebars, so that their readers are more focused on the content of the pages and posts on their site.
WordPress usually comes with some widgets such as RSS, Resent Posts, and Meta that are enabled by default.
In fact, these widgets aren’t that useful. So if you’re wondering how to disable them, do the following.
Add/Remove Widgets to/form Your Site’s Sideba
1. Go to WordPress Dashboard and click on Appearance > Widgets.
2. Locate a white box titled Sidebar or Blog Sidebar (or something similar).

This is the place where your widgets reside. If you’d like to remove a widget from displaying on your site’s sidebar, simply click on that Widget and select Delete.
If you’d like to enable a specific Widget, just find it from the list on the left part of that page and place it in the Sidebar white box with a simple drag-and-drop.
You’re now online and ready to start – good work!
Your WordPress website is now ready to be discovered by millions of users online. By following the steps from this guide, in less than 30 minutes, you were able to install your new WordPress site from scratch.
Please let me know if you need any further help with creating and customizing your first WordPress website. I will be happy to help you.
I’d appreciate your honest feedback on this guide as the opinions of my readers help me understand if I’m doing a good job. So please feel free to leave a comment below.
Have a great day!