Last updated on June 26th, 2022 at 11:41 am
Creating a temporary link for WordPress sites hosted on cPanel can be a tricky one. Especially if you don’t have experience in such situations. But why would you need to create temporary link for WordPress on cPanel?
You may need to create a temporary url for your WordPress site if you:
- need a temporary address where you can access your WordPress installation without having to create a new domain or a sub domain for that purpose.
- have a hosting account that doesn’t support more than one domains or subdomains.
- are still in the process of development of your WordPress site and your domain name is still unknown.
Even if WordPress is functioning dynamically thanks to the domain name associated to it, using a temporary link to access your WordPress site is an absolutely valid scenario.
In order to create a temporary link for a WordPress site hosted on cPanel, do the following
Install your WordPress site on a Subdomain. The normal way.
Let’s assume that you want to install the new site on a subdomain.
Before proceeding, be sure your site is hosted by a reliable hosting provider such as Bluehost, InMotion Hosting or WP Engine. Having your site on a reliable and robust web hosting account will guarantee you the method for creating a temporary link for your site will actually work.
In order to do this, go to cPanel -> Domains section -> Subdomains and create your preferred subdomain. I’m going to use test.yoursite.com as a subdomain.
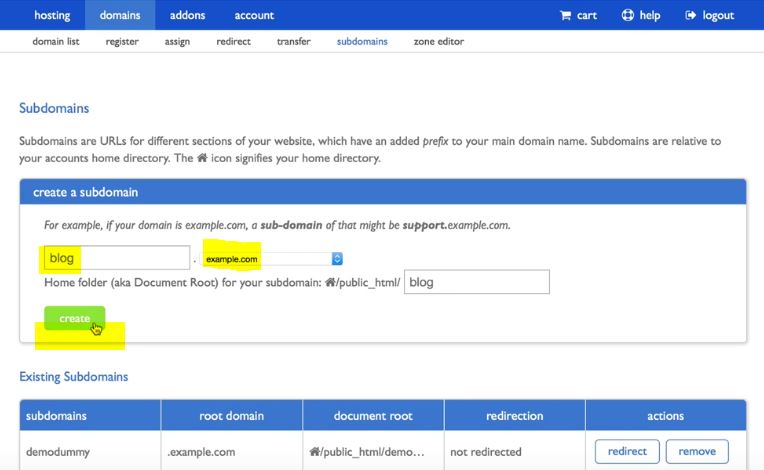
Note that the domain or subdomain in question doesn’t have to be a real domain name.You can even use facebook.com. That’s because we don’t actually need the real name of the domain or subdomain. Because we are going to replace that subdomain by a temporary url containing your hosting server’s IP address.
Once you create your new domain or subdomain, go to your WordPress installer and perform a new installation. Be sure to choose the domain or subdomain that you’ve just created. And wait for the installation to finish.
Note that the site will not be accessible if you actually use a domain or subdomain that isn’t pointed to your cPanel account.
Replace Your WordPress Domain Name with the Actual Temporary Link from the Database
Now, we want to replace the domain name with a real temporary url.
To do this, go to cPanel -> phpMyAdmin.
Then find the database of your newly installed WordPress site. Expand it and find the table called wp_options. Then find the two tables named home and siteurl.

There you will find the actual domain name for the installation. We need to replace these two values with the new temporary url.
Generate Your Own Temporary Link for WordPress
Your temporary url or temporary link has the following structure:
http://IP-address-of-your-cPanel-or-hosting-server/~cPanel-username/site-installation-folder
Meaning that a real-life WordPress temporary link will look like the following:
http://77.123.111.5/~username/test.yoursite.com
Now, if you use that link, you will be able to access your site.
However, it will look broken as at this point we haven’t replaced the values for siteurl and homeurl in the wp_options table.
Now, replace these values with the temporary link for your WordPress site.

Once we replace these values with the new temporary url, your site will be fully accessible though your new temporary url.
In order to check this, just make sure you paste the temporary link in your browser.
Access WP Dashboard from a Temporary Link
To access your wp-admin area, make sure you add /wp-admin at the end of the temporary link. Just like this:
http://IP-address-of-your-cPanel-or-hosting-server/~cPanel-username/site-installation-folder/wp-admin
Or
http://77.123.111.5/~username/test.yoursite.com/wp-admin
Create Temporary Link for WordPress on cPanel via Hosts.cx
Hosts.cx provides a great method to access your site via a temporary url. That’s done with the help of a testing url that is automatically generated for you.
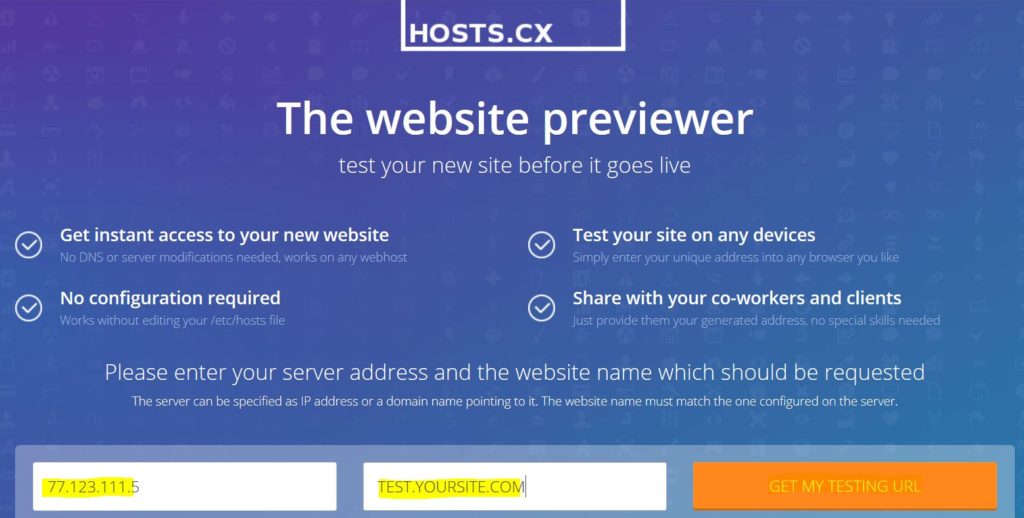
To create a temporary link for your site through hosts.cs, do the following:
- Use your IP & Domain. Put your cPanel’s IP address (if you’re on a shared hosting account) or your server’s IP (if your have a dedicated IP address) and the domain or subdomain associated to your site.
- Generate your temp url. Click on Get My Testing URL.
To access your admin area, be sure to add /wp-admin at the end of the temp url generated from hosts.cx.
Your link should look like the following.
