
Last updated on June 26th, 2022 at 11:41 am
Thinking about signing up with Hostgator to install WordPress and create your website or blog?
Don’t sign up before reading this honest review. I will be showing you step by step how I created this exact website in just minutes after signing up.
Quick jump to:
Hostgator Hosting Services Overview
Choosing the right hosting plan at Hostgator
Install WordPress on your Hostgator account
Log in to your WordPress site hosted with Hostgator
Change the theme and customize the header image of your WordPress site at Hostgator
Create a new blog post, add new content and images to your WordPress site hosted with Hostgator
Add your posts to a new Category of your WordPress site hosted with Hostgator
Create pages for your WordPress site hosted with Hostgator
Add a Menu to your WordPress site on Hostgator
Hostgator Performance Test
Improve Hostgator speed performance by installing a caching plugin
Hostgator Tech Support and Reliability Overview
Hostgator – mostly Pros and almost no Cons
I’ll walk you through the different plans and pricing to find out the best value to save you a ton of money.
And I will show you how to install and get started with WordPress at Hostgator and finally test performance and reliability. Keep reading to find out more.
Choosing the right hosting plan at Hostgator
Let’s get to the review first.
We’re going to look at plans and pricing to figure out what the best value is, Also, what costly add-ons or unnecessary features we should avoid, so we don’t waste any money.
The prices we’re going to be looking at are going to be heavily discounted because we have gained special access to the latest promotions and deals from Hostgator.
If you want access to the same discounted pricing, click the link below, scroll down and you’ll find a button and a banner which will directly link you to Hostgator latest promotion.
When you use this link it will automatically add in the best coupon code when signing up. Not a bad deal at all.
Okay, so after clicking the button it will take you to this page about webhosting, saying Now on sale. Click the Get Started Now button to see the available plans.
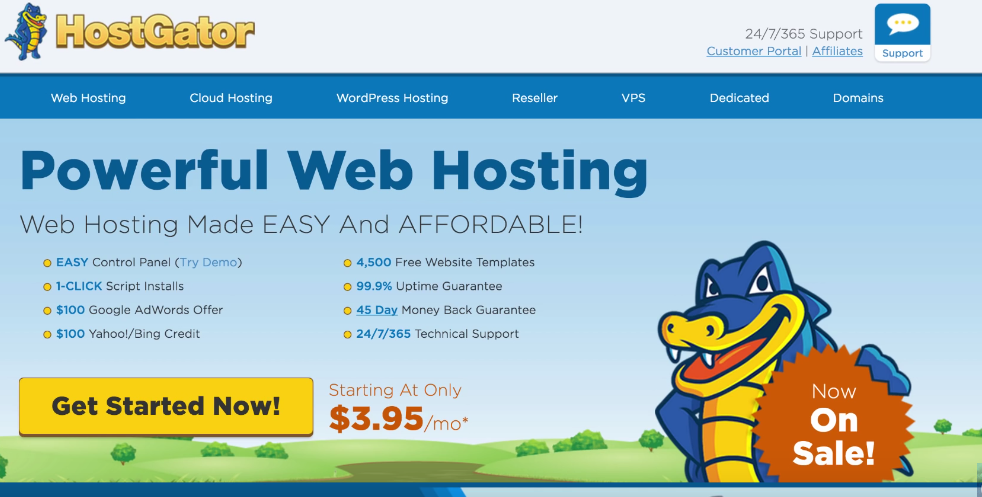
As you can see, there are three different web hosting plans – Hatchling, Baby and Business plan.
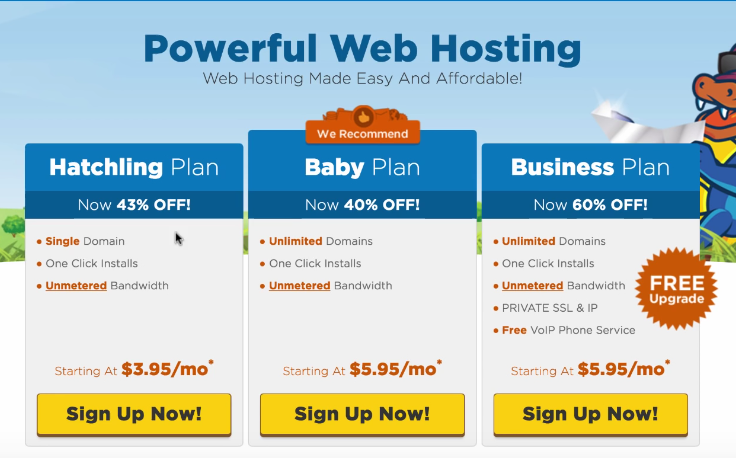
All you really need to get started is the Basic Hatchling plan. It includes a single domain, one-click install for WordPress and other scripts and unmetered bandwidth which means unlimited storage for your articles, photos and videos.
The difference between Hatchling and the Baby and Business plans are that they allow unlimited domains which means you can start multiple web sites with a single account.
I would recommend going this route if you have more than one website in mind. Also you can upgrade at any time if you’re worried if the performance will be enough.
One of my main sites runs on the basic Hatchling plan and receives thousands of unique visitors per month without a hitch. I’m going to choose the Hatchling plan which then takes us to the Checkout Page.
Register Your Domain
Step one is to register a new domain which is your website’s name, such as wpbackend.com. For example, this page allows you to see if your domain is available or if it’s already been taken.
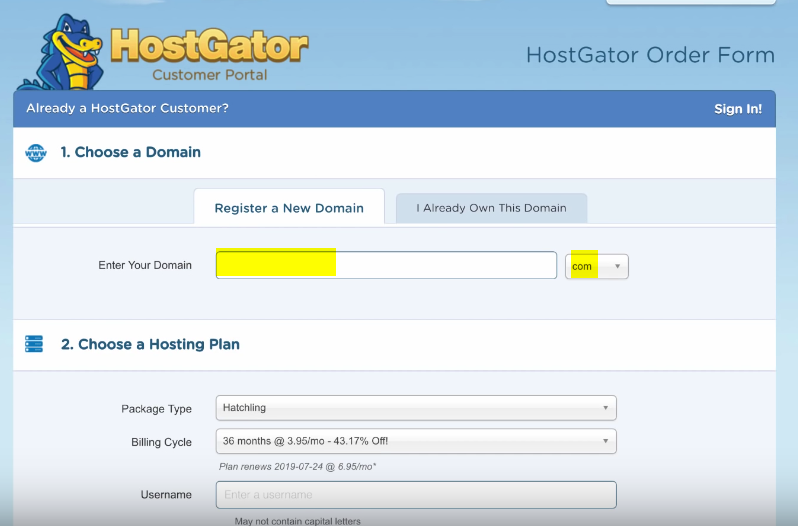
My advice is to definitely go for a .com that’s available which is the most recognizable extension, adding credibility to your brand. After you found your domain it will add the cost of 12.95 per year which comes out to a little over one dollar per month, so pretty affordable.
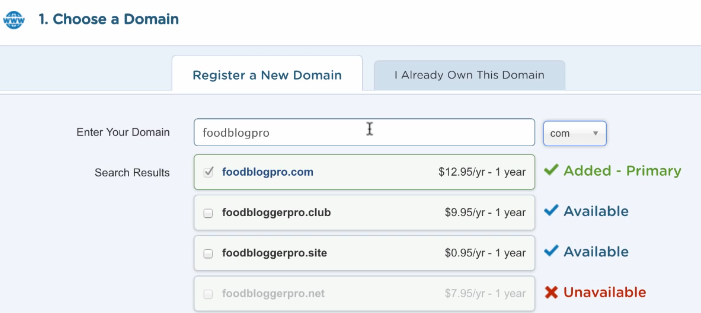
Before step two, there’s a sneaky option that says Domain Privacy Protection that is already checked by default.
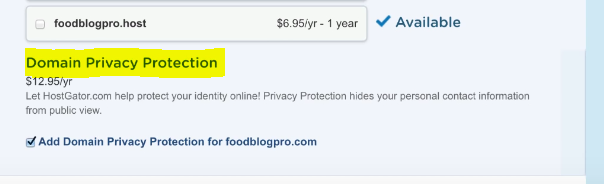
This adds an additional 12.95. This service hides your Whois information if anyone wants to look up your domain. It’s up to you if you think you need this. If not, then uncheck this to save 13 dollars.
Hosting Plan
Step 2 is choosing your plan. As I’ve discussed before, the Hatchling package is more than enough for a beginner website or blog.
The billing cycle is where you get to choose how long you want web hosting for. The longer you choose, the bigger the discount you receive.
One cool thing about Hostgator is that they offer terms shorter than one year which most other web hosts don’t. You can choose monthly plans instead of annual.

Although these do not receive any discount, my advice is to definitely go for at least the one-year plan, if you can afford it, for a couple reasons.
First, you get a nice discount from using our coupon code which right now is a whopping 33 percent. You won’t save any money from going with any of the monthly plans. In fact, the cost difference between the six months at 10.95 and twelve months at our discounted rate of 5.95 comes out to be less than 6 bucks, so that’s six extra months at a dollar per month. Can’t beat it.
Second, by going with a one-year plan, you’re committing yourself to the website since a year is plenty of time to build and grow and expand your website. Usually, the lack of commitment is the reason why people fail in the first place.
Lastly, Hostgator offers a generous 45 day money back guarantee. If at any point you decide you don’t want to have a website anymore, you can easily get a refund. But if one year is more than you’re willing to pay for, go for 3 months instead. Then if three months is too much, one month is better than nothing. The key here is to just get started.
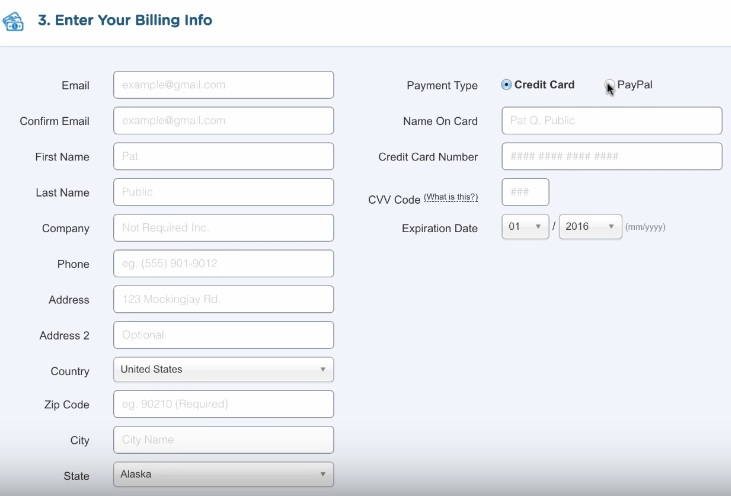
Billing Infromation
In step 3, fill out your billing info which can be either credit/debit card or PayPal.
Select Additional Services – Optional
Step 4 is the Additional Services section. And honestly, you can uncheck all of these as they are not necessary at all.
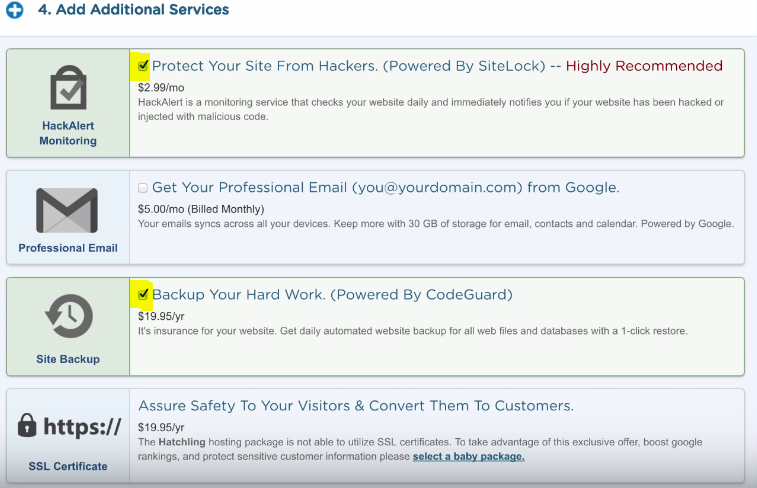
By default a couple of these will already be checked, so watch out for that as it’ll add an additional $50 to our total cost.
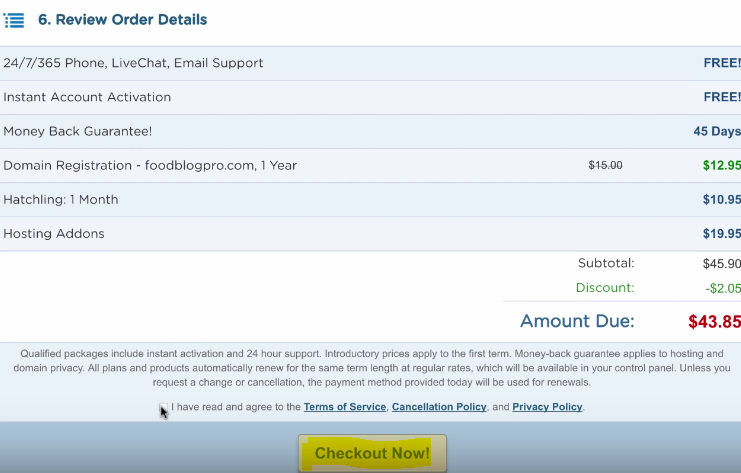
Review Order Details
Step 5 is for adding a coupon and as you can see, the best available coupon has already been automatically added for using our special link.
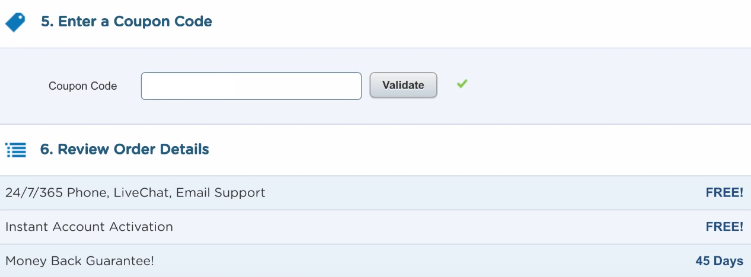
You can review the total cost and order details and step 6 and when ready, hit the Agreement to terms and conditions. Then click Checkout.
After you checkout, you’ll be taken to this page which is just a confirmation page on where they basically say that they’re setting up your account and they’re going to be sending you an email for confirmation also including your login information.
If you think this is taking excessively long, you can click here if you aren’t automatically redirected.

If this is just loading and loading for minutes, let’s say five minutes, and it hasn’t redirected you to your account, then you should click this at the bottom so that it can take you to your account.
Access Your Account
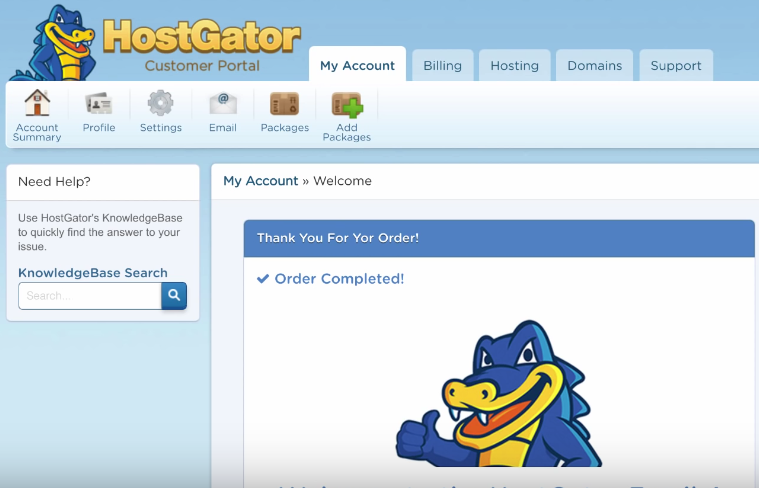
Okay, so as you can see here, this is the page that you’ll be taken to after your account is created or if you click that redirect link in the bottom.
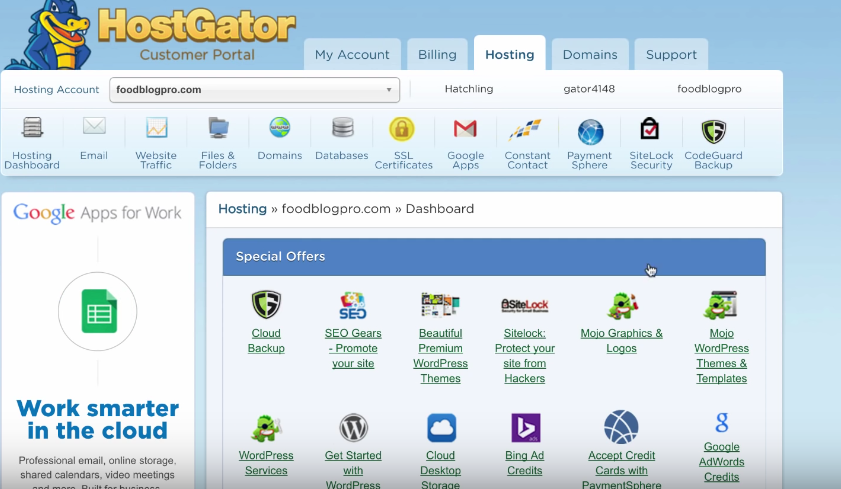
This is basically your home page. Sort of a control panel. What you want to do after this is you can just go straight to Hosting. This Hosting tab at the top navigation.
Install WordPress on your Hostgator account
Go into Hosting and here is where you will see all of the features.
Don’t get overwhelmed. I know there is a lot of things on here. Probably a lot of stuff that most beginners are not familiar with. With that said, if we want to install WordPress, all that we really have to do is just go to Special Offers and Get Started with WordPress Today.
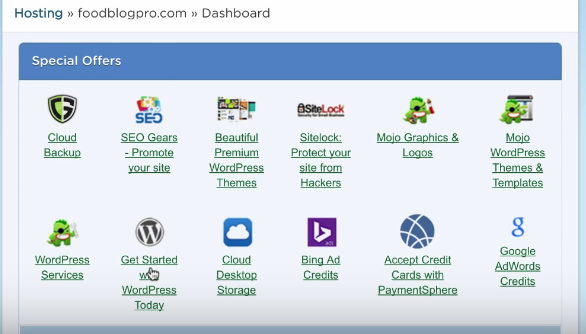
This is your WordPress one-click install.
So all you do is click that.
Select WordPress One-Click Installer
After you have clicked the Get Started with WordPress Today, it takes you to this quick install marketplace.
I’ll just click OK. I’ve got it and here you’ll see Install WordPress for FREE.
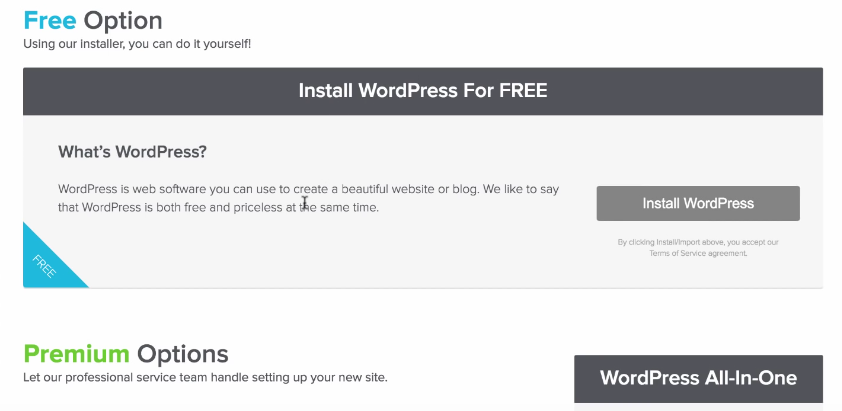
This is exactly what we want to do.
It’s a one-click install for WordPress.org and this will install on to the domain which we have signed up with for our account.
Avoid Premium Options
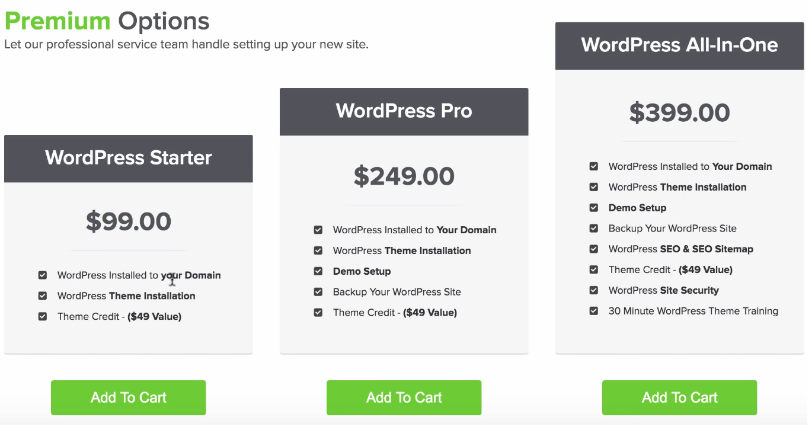
If you scroll down here, it says Premium Options.
You want to avoid these, trust me.
As you can see, by these prices, they are extremely expensive services and, to be honest with you, I really do not think that they’re worth it.
We can do everything by ourselves and I’m going to show you exactly how to get WordPress installed to your domain.
I’m going to show you guys how to install new themes and this comes with a theme credit.
This doesn’t really make that big of a difference. Basically, you’d be spending 50 dollars for them to do what we’re about to do for free within five minutes. And so obviously I don’t think that any of these are worth it.
When you get to this page, please avoid the premium options at all costs, because they are just going to rack up your bill and you do not need any of this.
I’m going to teach you guys how to do everything in this package for free and within the next 10-20 minutes.
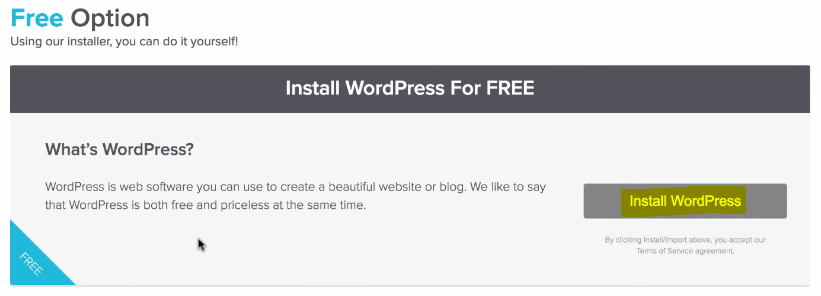
Choose the FREE Install Option
Go back to the free option, click the Install WordPress. Fill out this form.
Basically, this is our domain which we signed up with.
You can skip this because we’re going to install WordPress on to our basic home domain. And then basically for admin email username, last name just fill this out with whatever information you want.
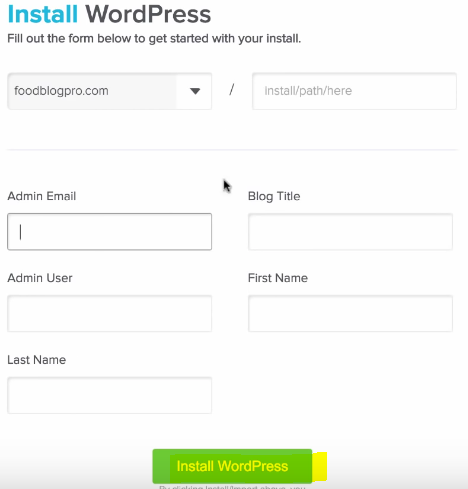
So for me, I’ll click this green Install WordPress. When you’re ready, once again we’re hit with this upsell – no thanks! I am a web designer.
You will see this bar up top which installed so quickly. It didn’t even give me time. It says Your install is complete.
Click here to view your notifications, View Credentials.
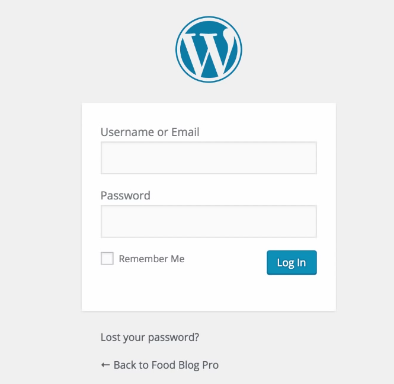
Credentials – this is the information that you’re going to use to log into your WordPress. This is the URL where you log into WordPress.
So it’s going to be your domain slash yourdomain.com/wp-admin.

This is sort of like the normal URL structure for logging into a WordPress website. You’re going to click that.
Make sure you take note of this information – your username and then your temporary password. You can just copy and paste that so what you can do is just open this up.
I’ll open this up in the new tab just so we have this information ready. As you can see here, this is the WordPress login and it’s already installed.
Log in to your WordPress site hosted with Hostgator
That took literally five seconds after we click the Install button.
Just put in your information such as your username, your temporary password and then login.
After you input that information, you login, you will be taken to the WordPress Dashboard.
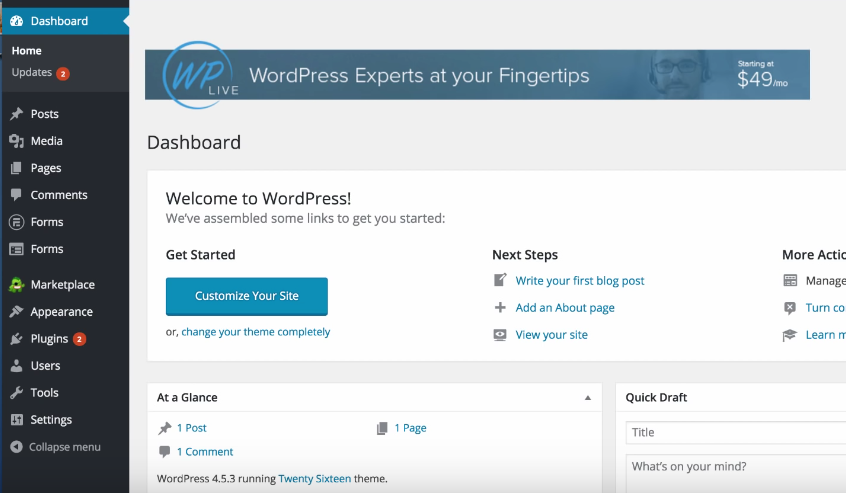
Here we have our WordPress dashboard.
This is our freshly installed WordPress on our Hostgator account. And as you can see, here this is the dashboard for WordPress where you can control your website, customize it, do all sorts of things.
Don’t get overwhelmed if this looks confusing because I’m going to basically run you guys through how to get started with WordPress. And we are going to be transforming our website in just a matter of minutes.
I’m going to give you the tools to turn you into WordPress wizards in no time.
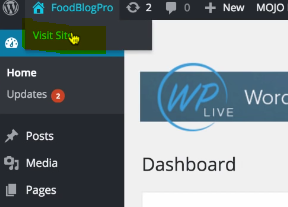
So if we click Visit site up here we can see what our website looks like.
Change the theme and customize the header image of your WordPress site at Hostgator
As you can see, it’s very basic.
It’s a little bland on just black and white, very simple theme. This is the factory stock theme called 2016 Twenty Sixteen.
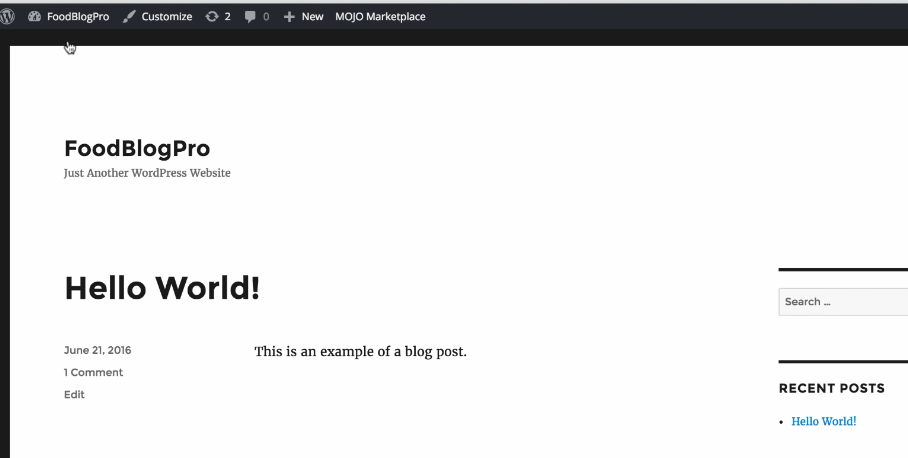
We have our website’s title in the top left corner. Then we have our first blog post which says Hello World for the title. Then it has a snippet along with date in the sidebar.
We have recent posts, recent comments, archives, categories.
This is a sidebar. And this auto populates with new posts when you add new blog posts to your website.

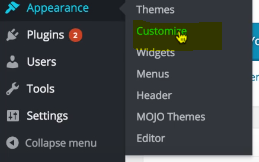
Let’s go back into that Dashboard. Our first step is we’re going to hop into Appearance and then Themes.

Preview & Activate the Themes
Themes are what control the overall design of our website.
And it’s beautiful because we can literally browse through thousands and thousands of beautiful gorgeous themes. Everything from e-commerce to business you can find it here.
And the beautiful part about all this on is that you can start using any of these themes for free.
Some of them have a small one-time fee to unlock the premium or the full version. But you can get started with a free version of any of these if you’d like so for our blog.
Finding the Right Theme
Since I’m going to do something like a food blog, I’m just going to look up ‘food’. And as you can see, here we have tons of gorgeous, gorgeous themes right off the bat.

I mean scroll down, look through these, find one. I like this one. Looks cool, so what we’re going to do is just click Preview right here.
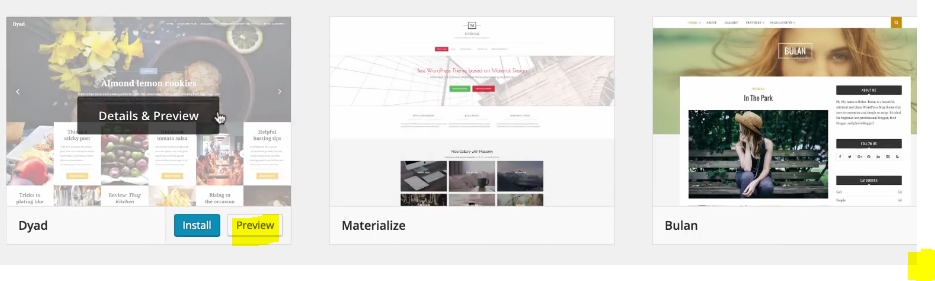
It’s going to give us a Live Preview of what our website is going to look like. And since we don’t have any content, it’s not going to look like this thumbnail with all these pictures because we don’t have any pictures on our website yet.

Here we have the Preview and this is basically how the theme would behave in terms of the design. And if you have a blog post it would show up here under the header.
I like this theme, so all I have to do is to click Install, wait a couple of moments and the theme is installed just like that. So easy.
So click Activate in order to apply the theme to your website and just like that we are now using this theme which by the way is called Dyad. If you want to use this theme for yourself, it’s called Dyad by Automattic.
You can look it up in the Themes and so after that let’s visit our website once more to see where we’re at.

It looks just like the live preview. As you can see here we have our header and if we scroll down our tagline kind of disappears and then the blog post shows up right here.
Customize the Theme
Let’s go back and then let’s spice things up. Let’s add some images to start make our website look like that thumbnail which we saw in the theme section. What you want to do is go back into Appearance, go into Customize.
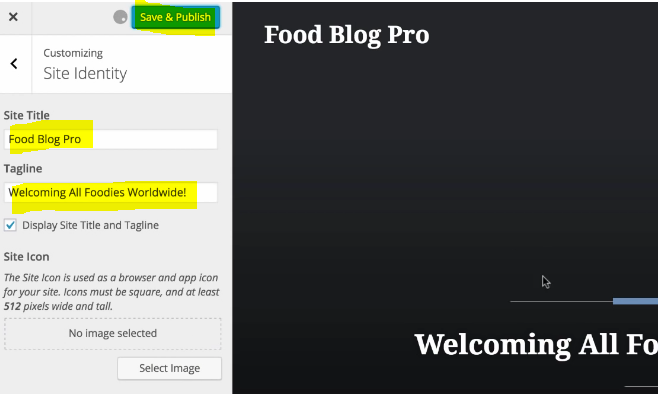
We’re going to go into Customize here and what we’re going to do is we can do things like change our Site Identity which means changing the title on the top left.
Let’s say we want to add a couple spaces here, change this Tagline to anything we want.
So you can literally say whatever you want here. I’m just going to say Welcoming all foodies worldwide.
There we go.
Save & Publish that to post it live and then let’s go back.
Add Image to the Theme
Let’s add an image here to really liven things up. I’m going to click Add New image here. If you have an image, you can drag and drop it into here which will upload it into your website.
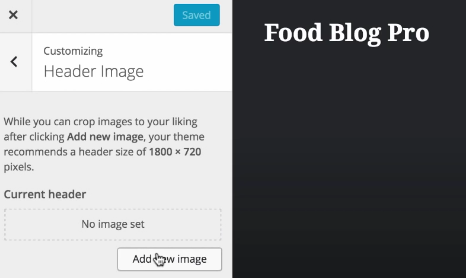
I’ve already uploaded our header before. It’s this beautiful picture of pizza and it has the dimensions that were mentioned on here on the sidebar. Let’s just select this image first of a beautiful gorgeous pizza.
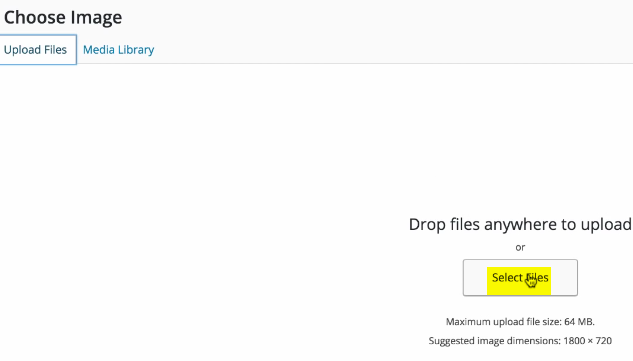
We’re going to skip the cropping here. They recommended a size of 1,800 by 720 here just read on.
In the sidebar they’ll tell you the dimensions usually for the image and then all you have to do is edit your image to fit those dimensions.
Even if it isn’t in those dimensions, I think you can just crop a bigger image or you can stretch a smaller image if I’m not mistaken.
As you can see here, right off the bat adding in that header image has completely transformed our website already.
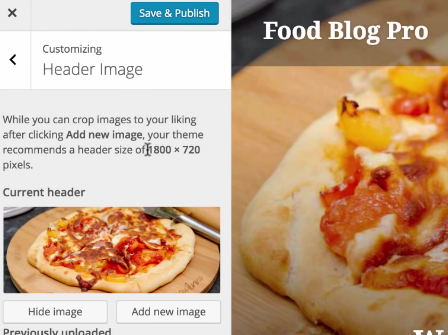
Look at this gorgeous picture of pizza. Who doesn’t love pizza?
We have this nice tagline welcoming all foodies worldwide. Save and Publish that and then let’s move on to the next part which is creating our first blog post.
Create a new blog post, add new content and images to your WordPress site hosted with Hostgator
We’re pretty good with this – we’re already ready making great progress in a matter of minutes.
Now our next step is we are going to go into Posts.
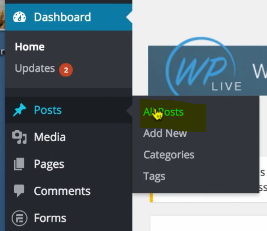
This is your blog post and as you can see here if we click All Pposts we have that Hello world. I’m going to leave that there and then I’m going to add a new blog post now here.
When you click Add New it’s going to take you to basically this is what it looks like when you are creating a blog post.
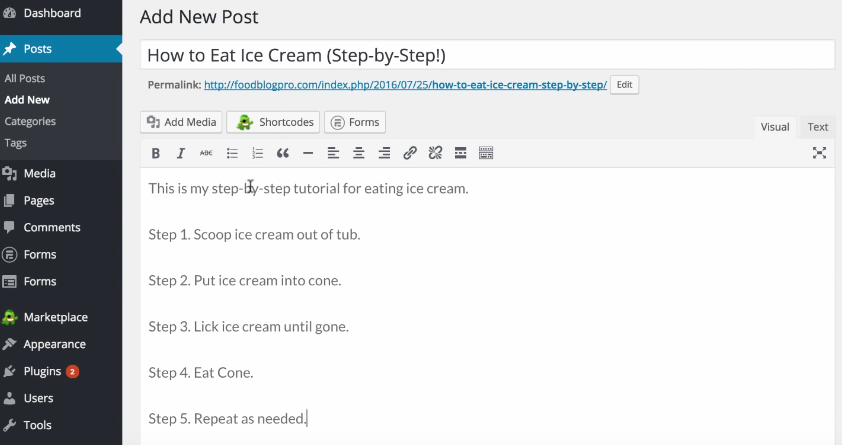
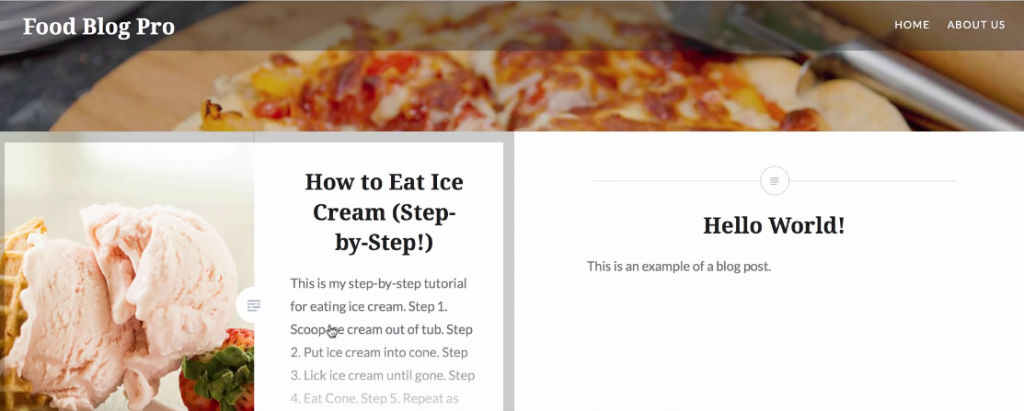
You start with the title so I’m just going to put ‘How to eat ice cream step by step’.
In our text box you can add whatever text, whatever images you want. So it’s pretty cool. I can just say ‘This is my step by step tutorial for eating ice cream’ and then you can just write stuff out here.
Alright, so the here’s my tutorial for eating ice cream. I just typed it out real quick.
We have our title, we have our post and the one thing you want to do is you want to add a featured image.
This is what’s going to show up in our theme.
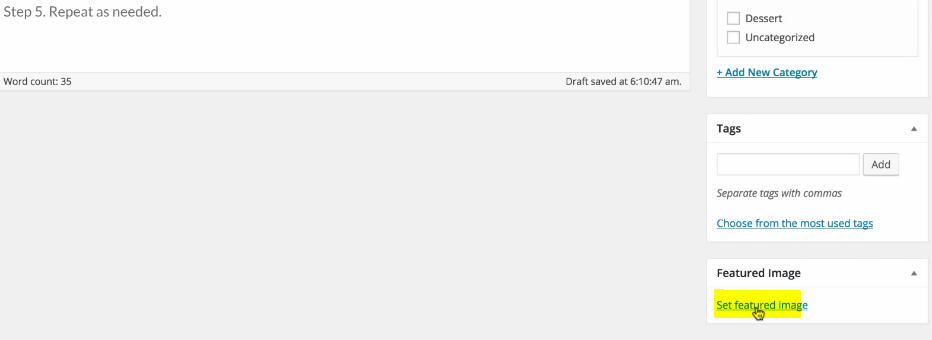
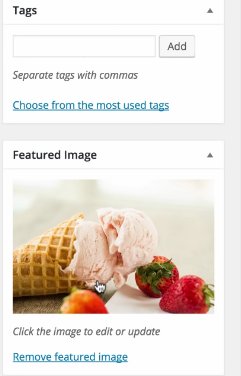
I’ve already uploaded an image earlier of this beautiful ice cream cone and I’m just going to add that as our featured image.
Add your posts to a new Category of your WordPress site hosted with Hostgator
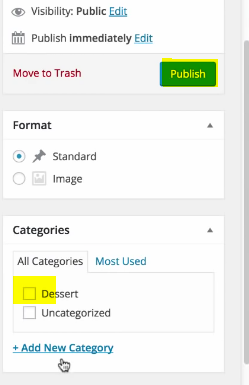
Here you can add a Category.
Earlier I added the category of Dessert, so I’m just going to check that and when you’re ready to go, all you have to do is click Publish and you’re good to go.
This is your first blog post. It’s got the featured image, it’s got a title, it’s got the posts.
You can view it right here, but what we’re going to do is we’re just going to look at our website because the post should show up on the front page.
I’m according to our theme, so we’re visiting our website, we’ve only been working on it for a few minutes now and as you can see we have already transformed this website.
![]()
You can see here our blogpost looks so good on the home page. We’ve got the title, we’ve got the featured image, we’ve got a snippet from it and then we have that header with the pizza in the background. And in our tagline this is looking so great and we’ve only been working on this for maybe 5-10 minutes.
Check the Results
Let’s click this ‘Read our first blog’ post to see what it looks like so this is our ‘How to eat ice cream step by step tutorial’.
We have that featured image of that beautiful strawberry ice cream cone which seems to defy gravity right here. But never mind, that so you have the title here we have the category and then we have the author, the date, everything.
Then as you can see our tutorial is here laid out, beautiful font. We even have our previous posts linked right below this post, so that’s amazing.
You can even leave a comment here. This is great and we just got started. Honestly, that’s all you guys really need to get started with creating your website.
In a matter of minutes we’ve transformed this from the basic boring Twenty Sixteen factory theme and we have created a beautiful food blog in just minutes. One last thing I want to show you is Pages.
Add pages to your WordPress site hosted with Hostgator
So Pages is the section of your website such as an About Us or Contact Us.
We’re going to add an About Us page and then we’re going to link it to the top navigation.
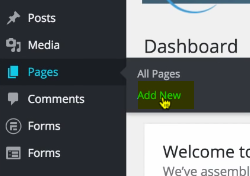
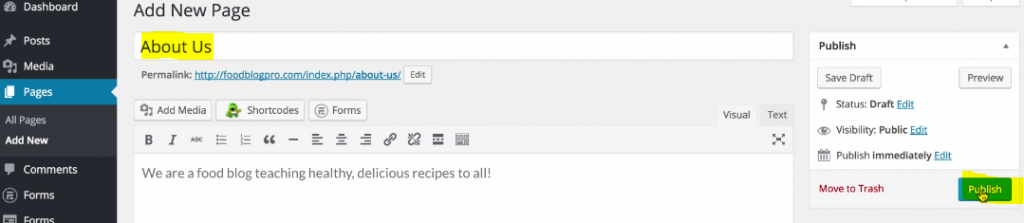
I’m going to click in the Pages. I click to Add New and we’re just going to call this About Us.
We are a food blog teaching healthy delicious recipes to all.
Add a Menu to your WordPress site on Hostgator
All right, awesome! We’re going to publish that real easy.
Nothing too intricate and we’re going to go back into Appearance and then we’re going to go into Menus, so that we can add this About Us to the top of our page.
What I’m going to do is add that About Us page.
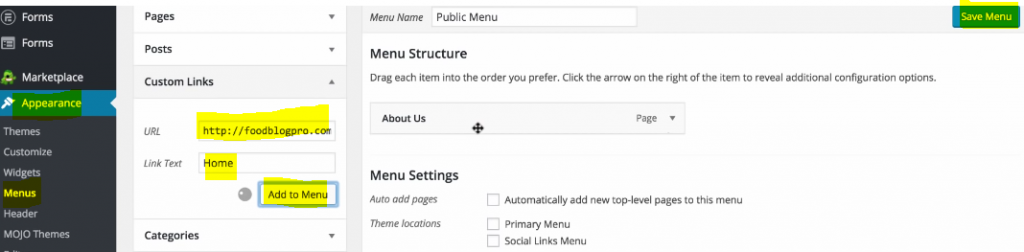
Let’s just save that menu.
Let’s add it to our theme. Go to Customize, we can click into Menus. Let’s select Public Menu as you can see here.
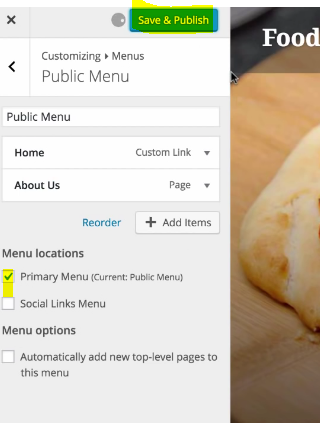
We have public menu. Let’s add that to Primary Menu, Save and Publish that.
There we go.We have added our pages to the top navigation bar, we have the Home which simply directs to the home page and then we have the About Us which takes us to our About Us page. Which We added that little snippet. This should be a very basic page. We are a food blog teaching healthy delicious recipes to all.
Go back Home and then we’ll take us to that beautiful home page with our header image of that delicious pizza and our first blog post on how to eat ice cream.
Plugins
That’s pretty much it. I don’t want to make this tutorial too long. I don’t want to go into it too much because you guys can read my other WordPress tutorials if you want to find out more especially about themes and then more about plugins.
Plugins are really powerful. These are things that would really transform your website and give your website a lot of power in terms of functionality. You can do everything from adding a contact form to turning your website into a social network.
Even if I’m not going to get into that because that’s outside the scope of this tutorial, but you can read my other tutorials if you want to learn more.
Hostgator Performance Test
Now we’re going to do a performance test of our website to see how fast our page loads and so we can gauge the performance of Hostgator servers along with our website.
To start things off just a little disclaimer. So we are currently on the Hatchling plan of Hostgator which is the lowest plan possible.
It’s the cheapest one and so the speed and the performance is going to also be technically the lowest speed. But with that said, I have had no issues in the past with using the Hatchling plan. And I have no doubt that this is more than enough speed for most people.
With that said, our website right now is not optimized at all we do not have a caching plugin.
A caching plugins is basically something that allows your website to have parts of it downloaded and this is what all the big websites do. They have caching enabled so that when people visit a website the first time they visit the website will always be the longest load time.
But your computer would download and save parts of the website so that the next time you visit that website, it will download and it will load up in a fraction of the time. We haven’t done that yet.
Our WordPress has tons of free caching plugins. And we’re actually going to install one to show you the difference in website load times on that a free plugin can make.
Like I said, all the big websites do this. We’re going to have to implement this. We’re going to add this plugin to our website to help increase the load times.
Test Raw Hosting Performance
But with that said, this is a raw test, no optimization on our website. We’re just going to use this tool called Pingdom Website Speed Test.
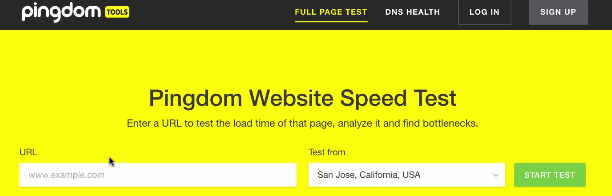
This company called Pingdom does this test where they grade the performance and the speed of your website.
You have to put in your website’s URL and then you choose the test location that is closest to you.
Since we’re in California, I’m going to go with the San Jose and just click Start Test.
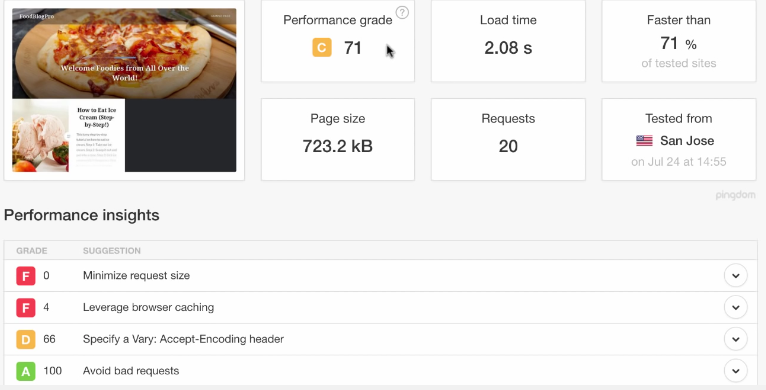
As you can see, here if we scroll down, we can see the test taking place. It’s showing things such as load time, how big your page size is, a number of requests. And then once the test is finished, it will show you your performance grid.
Right here you can see a little thumbnail of our website. We received a performance grade of a C which is 71.
A Decent Grade for Hatchlin
And it says right here that we are faster than 71% of tested sites. So to start things off, like I said with the disclaimer, this is the slowest plan that Hostgator offers. And this performance grade is showing us what our website is like from a raw standpoint without the browser caching here.
We received an F for Leveraging browser caching because we don’t have any caching plugin. Once we implement that, that should increase our performance and our load times. This is our raw test.
Right here you can see we received a C which is actually a very decent grade. This is like the average grade for hosting plans that are similar to this.
We’re talking about web hosting that’s on shared servers. This happens to be a bit better than others. This tested faster than 71% of sites.
What we’re going to do is we’re going to implement that caching plugin real quick and then we’re going to retest and see how much of a difference that makes.
Improve Hostgator speed performance by installing a caching plugin
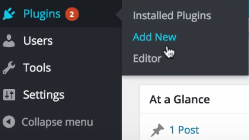
Go to Plugins in your sidebar, click Add New and type Caching Plugins to search for the most popular, so we might be able to find one right here.
WP super cache is over 1 million installs and we’re just going to install that one.

We’re just going to try this out so we just installed it, we activated it. It’s disabled and we’re going to enable it and then we’re going to retest.
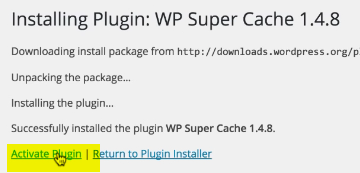
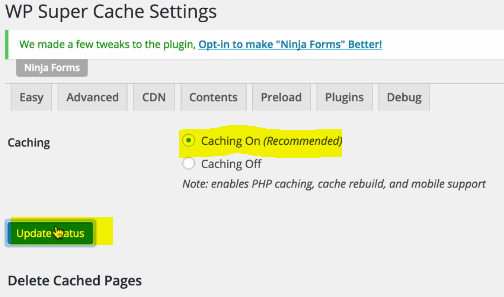
We’ve successfully installed the caching plugin.
And we’re hoping to see some improvements upon that performance grade of a 71 and also we tested faster than 71 percent of other websites.
We installed a caching plugin real quickly and honestly we installed it in seconds, we haven’t really done any other major changes. We activated it and now we’re going to retest on the website and then see if we see any significant improvements.
Now we’re going to start that test. Scroll down here.

Alright. Since by installing that one caching plugin, as you can see, here we’ve seen a slight improvement.
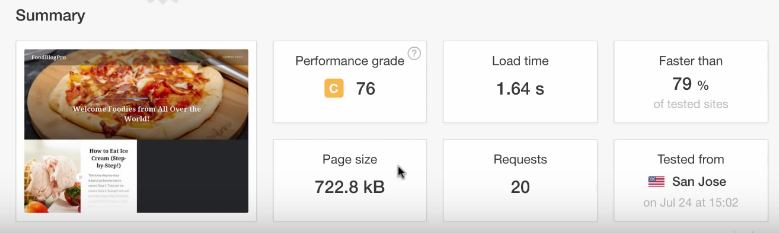
Our performance jump from a 71 to 76 and now we are faster than 79% of tested sites.
Our load time cut down from 1.9 to a 1.6 and our page size is still pretty big, because of that header image.
But overall, we have successfully increased the speed of our website and this is honestly very decent performance for the money.
You have to realize that we are on the lowest price plan from Hostgator and you’re not really going to see performance grades of B or A’s from webhosting that is this inexpensive.
Basically, performance grades for websites that have A’s and B’s are not only fully optimized. We just started making this website like 10 minutes ago, so there are ways to improve this further.
With that said, performance grades of A’s are reserved for very optimized websites that are running on dedicated hosting that can cost you upwards of $100 per month.We are obviously not paying anywhere near to that. We’re paying about six bucks per month. So a fraction of dedicated hosting.
Very Good Overall Performance
But we are getting performance that’s faster than 79% of the tested websites. Honestly, that is a very good performance for the money.
It’s all about value here. Because obviously if we wanted the most performance, then we would be going with dedicated hosting 800 bucks a month. And then we wouldn’t have to worry about that we wouldn’t even have to take this test.
But with that said, we’re trying to look for the best value here and this is very great. I mean, a load time under two seconds.
If this is your first website, your first blog, this is going to be very good performance, very satisfactory performance for the money.
Like I said, my site has thousands of unique monthly visitors. And I haven’t had a single problem with the Hatchling plan which is the basic plan that we chose as well for this website.
For the performance of 76% and faster than 79% of tested sites, I will gladly take that for $6 per month.
Honestly, it doesn’t really get much better than this. At this price point you’re going to have to go to at least 20, 30, 40, 50, 100 bucks a month if you want to see a drastic difference in performance.
Hostgator Tech Support and Reliability Overview
Alright, now we’re going to talk about tech support and reliability.
Tech support and reliability is a category or an aspect of web hosting that I think a lot of people should pay more attention to. I feel that it’s often overlooked so in terms of reliability what I’m talking about here is the uptime.
Hostgator Uptime
Uptime is basically the time that your website is online without any downtime problems.
On the other hand, refers to moments where your website is currently down for maintenance due to servers being maintained and so forth.
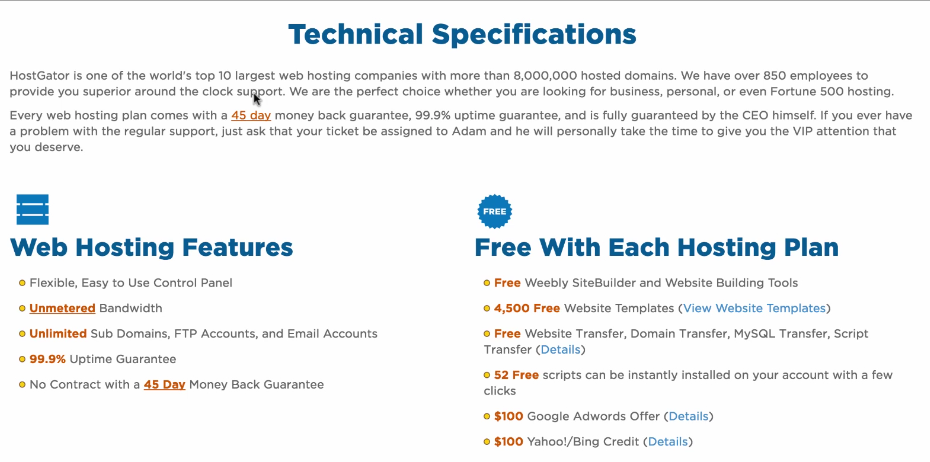
Here we are on the website at Hostgator and they have a guaranteed 99.9% uptime.
Now that’s very good because some webhosts advertise a 99% uptime. But that could mean ninety nine point zero percent.
Whereas in this case we’re talking about 99.9 % which is pretty good considering that you know we’re using the lowest level of web hosting. We’re on shared servers and this uptime.
To put it in the perspective, I have a calculator here and let’s just look at web hosting over the course of the years.
Let’s do some simple math. There are five 525.600 minutes in the year. What we’re going to do is we are going to multiply this by .999 which is 99.9% in decimal form and then we’re going to calculate that which comes out to 525.074.
We’re going to take the total number of minutes in the year which is 525.600 minutes. We’re going to do that minus this number right here and we are left with 525.6 minutes.
Let’s divide that by hours. We’ll divide that by 60. And there you go. So this number right here 8.76 hours out of the entire year that your website may or may not be down.
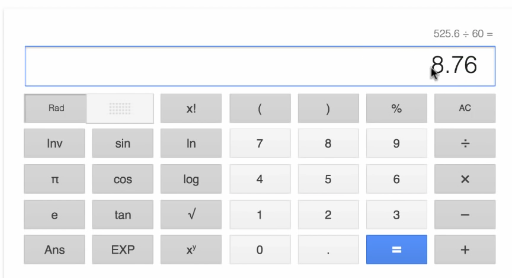
HosGator Uptime Review
So that 99.9% uptime literally amounts to being down for just eight hours in an entire year span. So 365 days, 24/7 – 8 of those hours in the year are taken up.
This is basically an estimate for how long you can expect your website to be down. If it does go down. They guarantee 99.9% and honestly that’s pretty much as good as it gets for shared servers at this level.
It’s pretty hard to guarantee a 100% uptime. In fact, it’s near impossible because things happen with servers you know you have to do maintenance. Sometimes there has to be migration, so on and so forth. I mean, less than nine hours down an entire year span is pretty good in terms of reliability.
HostGator Tech Support Review
Now, let’s talk about tech support because it is something that I’ve used many times in the past.
Whether it’s troubleshooting issues or if it’s changing settings such as PHP settings within my website, I’ve had to contact tech support.
Now I will say with Hostgator that their tech support, as you can see here, is award-winning. It’s great.
They have 24/7, 365 premium support and you can access them via phone, live chat and then also through something called a ticket system. It’s like you submit your issue and then they reply to you via email to help you solve this problem.
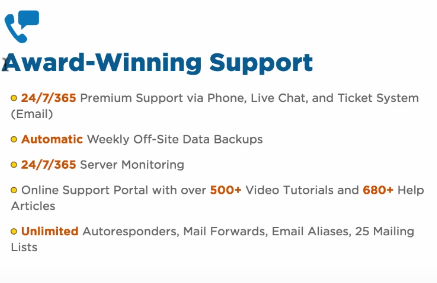
If you look at Hostgator, they are a top 10 web hosting company.
In fact, I’m willing to bet that Hostgator is probably close to the top 5 if not top 3. They have over 850 employees. This support is just top-notch.
A lot of other companies, I’m not saying that Hostgator doesn’t do this, but there are other hosts out there that totally outsource their tech support. But obviously the quality, especially if there’s some sort of language barrier, is going to suffer.
And that happens to be one of a lot of customers’ biggest issues with other hosts. The tech support is just not helpful at all.
My Personal Experience with HostGator’s Support
Here with Hostgator you can live chat with them and they’ll have your problem fixed within minutes.
I just used it the other day actually to change some PHP settings with my website. Simply turned on the live chat. And I had to wait maybe 1 or 2 minutes for my turn. I told them my issue and what I wanted to change.
And then within 2 minutes my problem was completely taken care of and yeah, that’s just an example of my experience with our tech support and spend nothing.
That’s one of the really big key factors in going with Hostgator. Top-notch tech support, you got 99.9 % guaranteed uptime, it doesn’t get much better than that for this price point. So pretty good overall in terms of reliability and tech support.
Hostgator – mostly Pros and almost no Cons
Alright, so bottom line Hostgator is a top web host for a number of reasons.
As you saw in this tutorial, we installed WordPress and started making a beautiful website in just minutes after signing up.
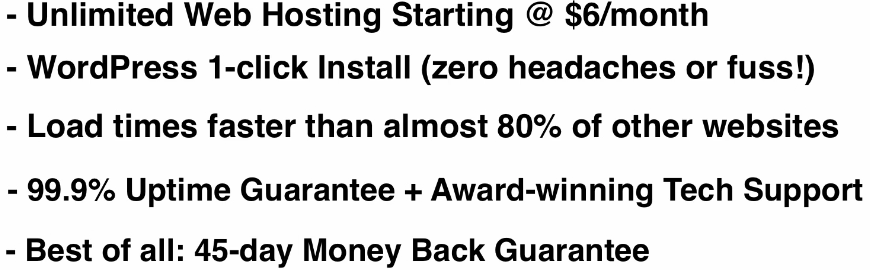
To sum up all the benefits, Hostgator offers unlimited web hosting starting at less than $6 per month.
- That’s one fast food meal or a couple cups of coffee. WordPress one-click install with zero headaches or fuss, low times faster than 80% of other websites which is stellar for the price.
- There’s 99.9% uptime guarantee and award winning tech support best of all, a generous 45 day money-back guarantee. So you have nothing to lose in conclusion.
I can wholeheartedly recommend Hostgator for beginners looking to start a WordPress website. Once again, if you want to take advantage of discounted pricing, click the link in the description below which will have a button linking you to Hostgator’s website.
Last but not least, if you found this tutorial useful, please leave a comment because it really helps the site to grow.
Also, subscribe for more WordPress tutorials and guides just like this.
If you made it to the end, thank you for reading and I hope you have a wonderful and productive day!