Last updated on June 26th, 2022 at 11:41 am
The reasons for having a slow WordPress site are different and unique depending on the type of the site you have.
WordPress is a quite simple content management system to use. Every webmaster has the freedom to work with additional modules such as plugins and widgets on their site. This makes the site really unique with its own strengths and perhaps flaws. Often these imperfections lead to slow WordPress load time and bad overall user experience.
In this article, we will have a look at the most common reasons for a slow WordPress site.
The easiest steps to speed up your WordPress site
The suggestions for improving the speed of WordPress in this article are just some simple steps that are easily implemented without any in-depth technical knowledge of WordPress.
Choose the fastest host for your WordPress site
Choosing the optimal hosting provider for your WordPress site is a process that you shouldn’t underestimate. While many hosting providers such as Bluehost, GoDaddy and A2 Hosting provide a very good hosting environment for WordPress sites, hosts like WP Engine and InMotion Hosting do offer managed WordPress hosting plans exclusively designed for WordPress.
If your site is hosted on a Managed WordPress hosting account this means that it already uses the resources of the server in the most optimal and efficient way.
WordPress hosting companies such as WP Engine provide automatic WordPress security updates, automatic daily WordPress backups, and optimized WordPress speed performance as part of their basic managed WordPress hosting plans.
Check and test plugin functionality for better WordPress performance
There’s a debate about the connection between speed performance and the number of plugins on a WordPress site. Some WordPress gurus argue that it doesn’t matter how many plugins you have on your site. What matters is their code quality. However, I partially agree with this statement. Here’s why.
The quality of the installed plugins is definitely an important part of the process of troubleshooting a WordPress performance issue. I’ll add that their code should be up to date too.
There are many plugins out there that are still working with the newest versions of WordPress. Even if they haven’t been updated for months and even years. If you want to have the latest version of the core WordPress files for your site, you should definitely use plugins that are updated regularly. This is so that they can keep up with every new version of WordPress.
If you use a lot of plugins on your WordPress site that is already slow, my advice will be to double check if the slow performance issue isn’t related to your plugins.
Check if plugins are the cause for your slow site
1. Go to Google Page Speed and test your site load time and overall speed score. Make a note of the results.
2. Go to WP Dashboard > Plugins > Installed Plugins > select All Plugins and click on Deactivate. Renaming the plugins folder in public_html/yoursite.com/wp-content/plugins is another way to turn off the plugins of your site.
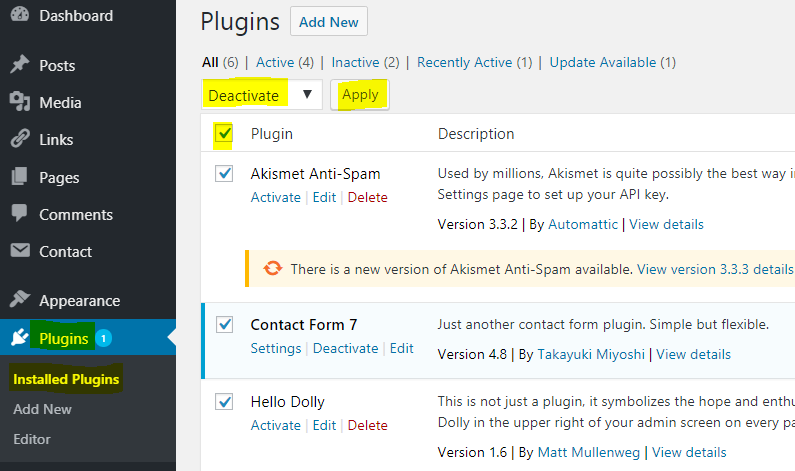
3. Note that deactivating all of the plugins at the same time can make your site loose some of its features. And this could lead to bad visitor experience. To prevent this from happening, you may want to create a staging copy of your live site. Then you can test my suggestions on a non-production site first.
Some of the major hosting companies such as WP Engine offer staging mode for WordPress for free as part of their services.
4. After deactivating the plugins, go back to PageSpeed Insights and test your site again. If the performance result is significantly better, you may consider uninstalling some of the plugins that are slowing down your site. If you’re still not sure which are the plugins that cause this, you can try with enabling the plugins one by one. Don’t forget to make a Page Speed Test after every plugin activation.
If you notice any speed or performance issue with the site after the activation of a plugin, then most probably that specific plugin is the one that slows down the site.
If it is one of the important plugins on your site, you may try to:
- Install an up to date version of the problematic plugin.
- Change the PHP version of the site.
- Contact the plugin developer for further support.
- However, uninstalling the plugin is most probably the best and the fastest solution.
Revise any obsolete plugins and uninstall them
Avoid installing plugins for simple features like Fonts, Analytics, Visitors stats.
Search for the code that you need to add to your site and add it manually to the site’s source code. Or add it in a text widget instead of installing additional plugins for each feature that you want to enable for your site.
My guide on how to add Analytics code manually to WordPress can help you figure out how to add other code to your site without the need to install any plugins.
Optimize WordPress database for better speed and fast performance
Regular operations such as cleaning up your obsolete posts or spam comments can leave behind orphaned post meta and orphaned user meta . These are in fact some of the artifacts that remain after regular housekeeping operations from the WP Dashboard.
To check if your WordPress site is optimized for high speed performance, you may need to optimize its database.
This is done easily with the help of a plugin such as WP Sweep.
If you decide to optimize your database with this plugin, make sure that your site is backed up. Cleaning up the database can lead to losing important data from your site. WP Sweep hasn’t been updated for a while now, so if you have any compatibility issues with it, make sure you follow these steps to further troubleshoot WP Sweep problems.
Enable WordPress caching for better speed results
Every time a user visits your WordPress site, the code of the visited page is being built at the same time of the visit. This means that WordPress uses server resources for every single visit on the site.
If there are a lot of visits at the same time, at some point the server will start experiencing some troubles with executing every single request. This usually leads to slow site performance and unhappy users.
Thankfully, there’s a workaround in such situations. It’s called caching. If caching is enabled for your site, the pages that were already visited previously will be loaded faster for every consecutive user that lands on these pages. The code of the pages that were already visited by other users stay in the server’s RAM memory which leads to faster load time.
There are hosting companies that provide such caching options for free for their customers. Some of the hosts such as A2 Hosting, WP Engine and InMotion Hosting have their own caching technologies that are optimized exclusively for their managed WordPress hosting environments. Such WordPress–ready hosting companies provide caching on three different levels: Static Caching, Memcached and Dynamic Caching.
Types of WordPress Caching
- Static Cache Level is responsible for caching CSS elements, images, Flash code and Java Script code in your hosting server’s RAM. As Random Access Memory is the fastest type of memory on a server, the static content is loaded from there and not from the HDD or from the SSD.
- Memcached Level works similarly to the Static one, but in this case it is responsible for caching the queries from the database of a WordPress site in the server’s RAM. If such queries are already available in the RAM memory of your hosting server, they will be served from there. This results in faster database queries and better user interaction with your WordPress site.
- Dynamic Cache Level caches entire web pages on a server. If Static and Memcached cache just some part of the pages of the site, Dynamic Caching caches all of the dynamic content of a page.
But no worries if you’re on a host that doesn’t offer any special caching features for WordPress.
There are already a lot of plugins that do this very well. Some of the plugins that may dramatically improve your site’s speed are W3 Total Cache and WP Super Cache.
Effective Use of Content Delivery Network or CDN for WordPress
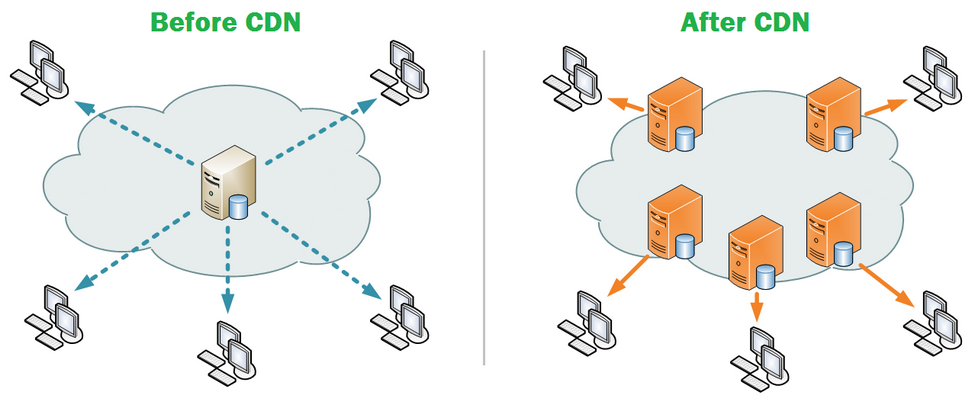
A content delivery network or CDN is a network of servers spread all around the world that delivers the content of your WordPress site to your users based on their geographical location.
This means that if your site uses a CDN and if a user based in Chicago requests a page from your site, the page itself will be served by the nearest server from the CDN network. Resulting in faster speed between the user and the server.
MaxCDN and CloudFlare CDN are the most popular content delivery networks for WordPress these days. Some hosting providers such as WP Engine and Bluehost provide CDN services for free with their managed WordPress plans.
Effective use of CDN for WordPress is key for fast speed performance. If you already use a CDN and would like to know if your site is using CDN effectively, then checking your site at WebPageTest could help you find this out. Here’s how an effective use of CDN should look like:

Use PageSpeed Insights to further optimize WordPress for speed
Google’s PageSpeed Insights is one of the best webmaster tools for analyzing webpage content. It provides suggestion for speed improvement if needed.
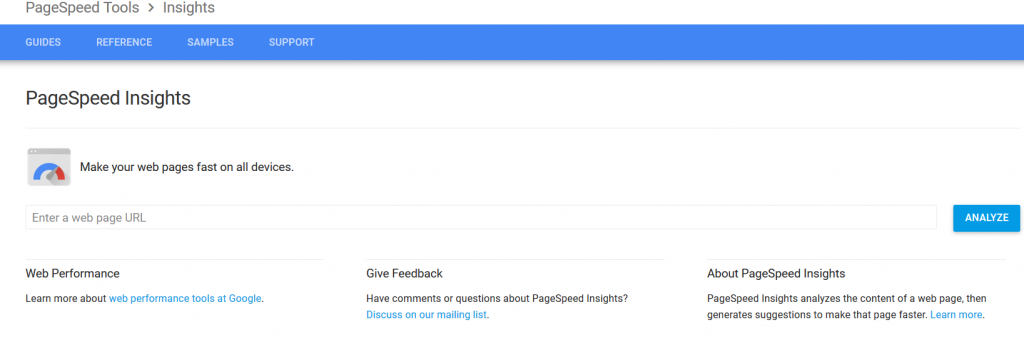
GTmetrix is another alternative option for getting recommendations on how to optimize your WordPress site for speed.

However, in this guide I will focus on fixing the suggestions for speed improvement from PageSpeed.
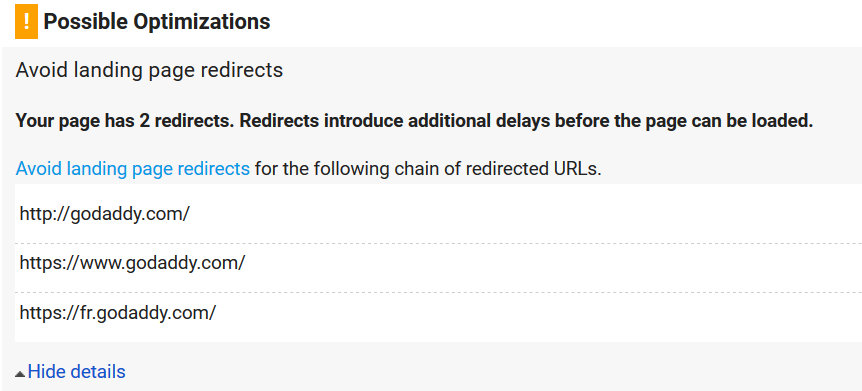
Avoid Landing Page redirects on WordPress
Landing page redirects are considered as possible areas for optimization and improvement by some of the major website speed test sites such as Page Speed, GMetrix and Pingdom.
While having redirects on your pages may be a bad sign for search engines, this may be still part of how your site works. In such cases, you may need to create the redirect from the server instead of creating it on the client side.
If your site uses redirections based on user’s physical location, online speed test tools may report this as a Landing Page redirect issue. As redirects cause additional delays before the page is loaded.
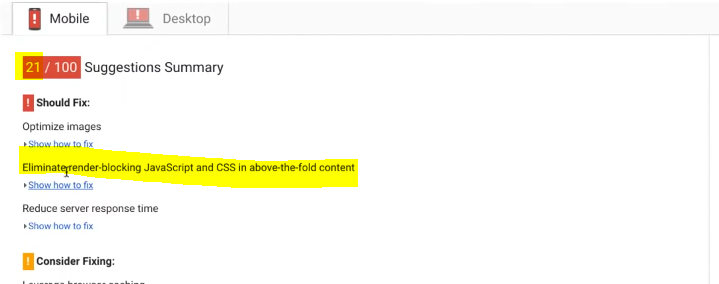
Eliminate render-blocking JavaScript and CSS in above-the-fold content
This is a very common suggestion from PageSpeed Insights and most of the WordPress themes receive this advice for further optimization of their code.
You can remove the render-blocking JavaScript and CSS in above the fold content with the help of a plugin called Autoptimize.
Once you install the Autoptimize plugin, make a backup of your site and activate the plugin. The plugin automatically removes all of the spaces that are not necessary in your site’s source code, thus making the code more optimized for speed.
If you have a look at your site’s source code prior to optimizing it with Autoptimize, you will notice that there’s a lot of free space between the various parts of the code. The plugin actually compacts the code so it is executed faster.

After the activation of the Autoptimize plugin and once the optimization of the site finishes, you can check the results by right-clicking on the home page of your site, selecting View Page Source.
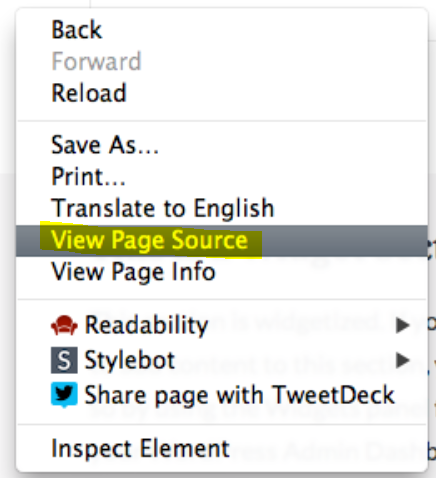
Your source code should look denser with fewer spaces just like on the following screenshot:

Eliminate render-blocking JavaScript and CSS with the help of Critical Path CSS Generator
However, just enabling a plugin such as Autoptimize is not enough to get rid of all of the Eliminate render-blocking JavaScript and CSS in above-the-fold content suggestions by PageSpeed.
In such cases, you can use an online tool called Critical Path CSS Generator to further optimize any problematic CSS items on your site.
1. Open the Critical Path CSS Generator tool in a new tab and go back to your site’s home page.
2. Right-click on a free space of your homepage and select View Page Source.
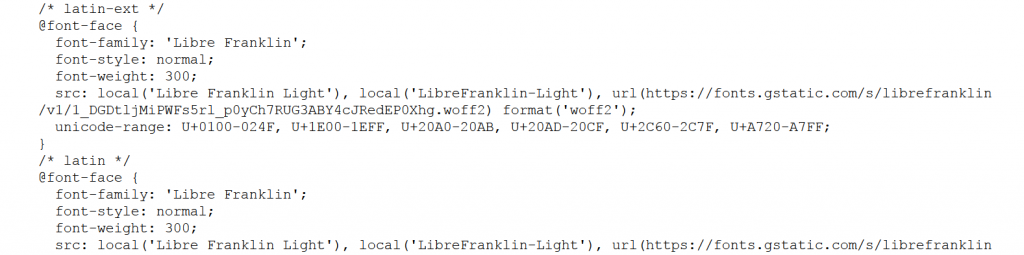
3. Find the problematic CSS item that causes a delay in rendering your page. In my case PageSpeed Insights says that it is the following:

Copy some part of it, right-click on your home page, select View Page Source and use CTRL + F to search for and find the CSS item that needs to be optimized.
![]()
Click on the hyperlink for that CSS item. Once you click on it, you will see its full content. In my case it looks like the following:
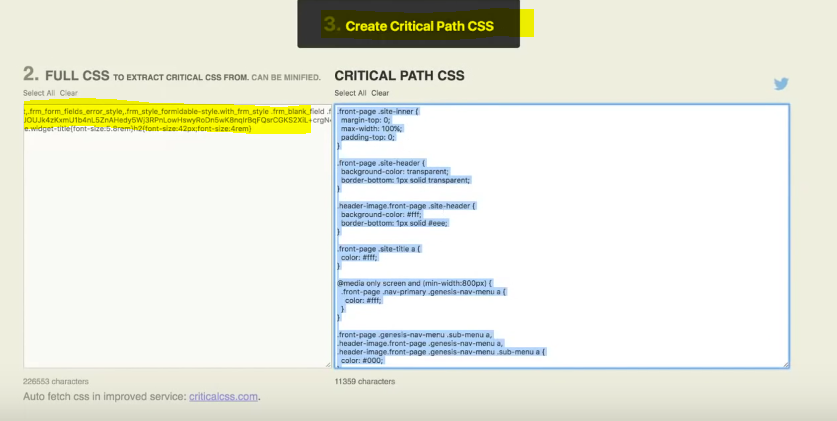
Highlight all of the content, right click on it and select Copy.
Paste the copied content in the Full CSS box of Critical Path CSS Generator and click on Create Critical Path CSS. Now copy the entire code in the Critical Path CSS box so that we can take it to our Autoptimize plugin.
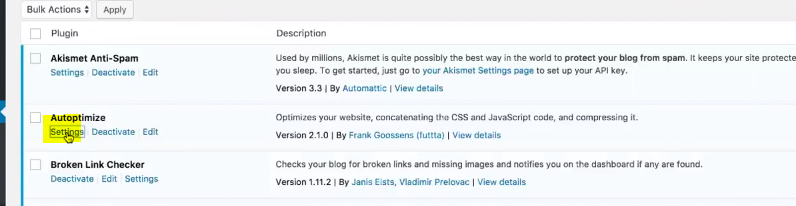
Go to WP Dashboard > Plugins > Autoptimize and click on Settings.
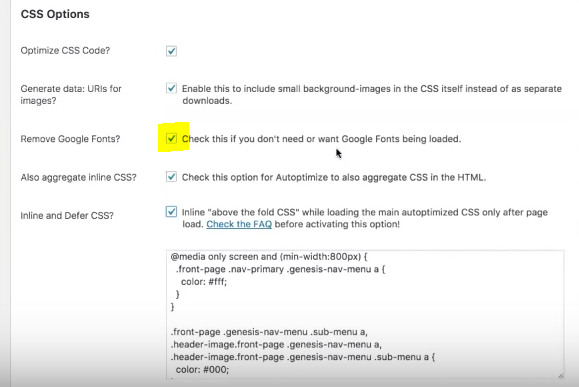
Click on the Advanced Settings button on top.

Make sure that all of the boxes are ticked. Notice that we need to see the advanced options for each of these sections.

Locate the CSS Options section.
Find the Inline and Defer CSS option and select Inline ”above the fold CSS” while loading the main autoptimized CSS only after page load.
Now paste the copied code from the Critical Path CSS Generator in that box.

Now make sure that there’s nothing in the two boxes called Exclude scripts from Autoptimize and Exclude CSS from Autoptimize.
Also Aggregate inline CSS should be selected. In some cases, it is a good idea to also select the Remove Google fonts option if want to have even better speed results for your WordPress site.
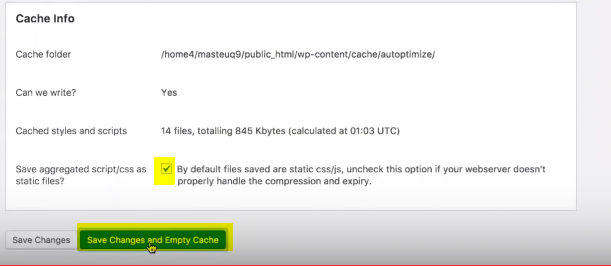
Leave Save aggregated scripts/css as static files option selected as it is and click on Save Changes and Empty Cache button.
Fix Optimize CSS Delivery for WordPress
If your WordPress site gets this suggestion for improvement from PageSpeed, this means that its non-essential stylesheets such as icons and fonts load synchronously. This leads to slow loading results.
In order to correct this, you can use a tiny plugin called Speed Up – Optimize CSS Delivery.
It does a really good job helping your site load its essential stylesheets synchronously while loading asynchronously the non-essential files.
Once you install the plugin, your site should start experiencing significantly improved page load times.
Leverage browser caching for your WordPress site
If set up correctly, Browser Caching is one of the most powerful cache techniques for speeding up your WordPress site.
With browser caching, you can instruct a visitor’s browser to save static elements from the site. So that they are used and downloaded from the browser’s cache instead of downloading them each time from your hosting server.
Here’s a tip on how to leverage browser cache for WordPress by adding a few lines to your .htaccess file.
Leverage browser caching for WordPress from the .htaccess file
In order to change the current settings for every visitor’s browser caching from the .htaccess file of your WordPress site, do the following.
1. Find your .htaccess file, right click on it and select Download. It is nice to download a backup copy of your .htaccess file so that you can use it if anything goes wrong. Now right click on it again and click on Edit.
2. Copy the following code and paste it in your htaccess file.
<IfModule mod_expires.c>

ExpiresActive on

ExpiresByType application/atom+xml "access plus 1 hour"

ExpiresByType application/json "access plus 0 seconds"

ExpiresByType application/rss+xml "access plus 1 hour"

ExpiresByType application/vnd.ms-fontobject "access plus 1 month"

ExpiresByType application/x-font-woff "access plus 1 month"

ExpiresByType application/x-javascript "access plus 21 days"

ExpiresByType application/xml "access plus 0 seconds"

ExpiresByType audio/ogg "access plus 1 month"

ExpiresByType image/gif "access plus 21 days"

ExpiresByType image/ico "access plus 21 days"

ExpiresByType image/jpeg "access plus 21 days"

ExpiresByType image/jpg "access plus 21 days"

ExpiresByType image/png "access plus 21 days"

ExpiresByType image/svg+xml "access plus 1 month"

ExpiresByType text/css "access plus 21 days"

ExpiresByType text/html "access plus 21 days"

ExpiresByType text/javascript "access plus 21 days"

ExpiresByType text/xml "access plus 0 seconds"

ExpiresByType video/mp4 "access plus 1 month"

ExpiresByType video/ogg "access plus 1 month"

ExpiresByType video/webm "access plus 1 month"

</IfModule>
3. Save the changes.
Congrats! Your site is now using browser caching for most of the cacheable resources on of WordPress. You may need to change the values in the quotes of the code until PageSpeed Insight accepts them.
Reduce server response time for your WordPress site
If you happen to get a Reduce server response time suggestion from PageSpeed Insights, this means that you might have issues with the performance of the server that your WordPress site is hosted on.
This could happen if you’re on a budget shared hosting plan. In this case, the best option would be to upgrade your current plan to a higher, more powerful hosting account.
The WP Engine managed WordPress hosting plans are one of the best ones out there. So be sure to consider their hosting offers if you have issues with your hosting server response time.
In my own tests, WP Engine and InMotion were the hosting companies with the best speed test results so far.
Standard Page Load Timing
Reducing server response time isn’t an easy task especially if you WordPress site relies on a lot of server resources in order to meet your visitor’s needs. An interesting fact is that PageSpeed Insights actually recommends reducing server response time even if the response time is less than 0.5 seconds which is still an excellent result already.
Basically, every server response that is less than a second is considered an outstanding result. Usually, the server response time is related to the amount of code and data on the site. The more data to download on a page, the more time it will take for the page to load completely.
If your result is between 3 seconds and 1 second – that’s fine, your site seems to be loading quite fast. Usually, the size of such pages is no more than 1 – 1.50 MB.
A server response time that takes more than 3 second is considered as a bad result. And in most of the cases it will negatively impact your search engine rankings. If a specific page has big unoptimized images on it, this means that most probably it will take some time for the page to load, resulting in high response time.
Enable compression for WordPress
If your code is optimized and compressed, it becomes faster to read and execute.
The time to load of WordPress is further reduced by enabling gzip compression.
The simplest way to enable gzip compression for your WordPress site is through a plugin such as W3 Total Cache.
If the visitor’s browser supports gzip compression, then the browser will automatically unzip the pages locally.
The good news is that most of the modern browsers such as Chrome, Firefox and Safari do support gzip by default.
Such plugins provide advanced caching options for your site even if it may seem a bit complicated to use at first.
Some alternative solutions to W3 Total Cache are WP Super Cache and WP Rocket.
Compressing resources with gzip can reduce the number of bytes sent over the network.
Minify JavaScript for WordPress
Minifying JavaScript means compressing the files, thus making them smaller in size. This reflects in the time needed for the visitors to download the files of the web page.
There are both automatic and manual methods to minify JavaScript on your WordPress site.
This is done with the help of a plugin such as Better WordPress Minify.
The plugin offers features for optimizing both JavaScript and CSS automatically.
Compacting the JavaScript code on your site can save your visitors many bytes of data. By minifying JavaScript at its maximum, the time needed for downloading, parsing, and execution will improve drastically.