
Last updated on June 26th, 2022 at 11:41 am
In this tutorial I’m going to show you how to create an Aliexpress dropshipping store using WordPress plus a free plugin called WooCommerce. My 8 steps to create your dropshipping store with Aliexpress & WordPress are here to help you get started now.
Also, I’m going to teach you how to use a free app called WooDropship. This app is not only going to save you a lot of time when you’re adding products to your store. It’s also going to allow you to automate the dropship and fulfillment process.
There have been a lot of people who have followed my tutorial where I show you how to create a semi-automated store using Shopify. And they want it to be able to do the same thing but with WordPress. Well thanks to WooDropship we now can.
It doesn’t completely automate the process, but it does greatly streamline it.
Now, this is going to be an 8-step process, but don’t worry. Because I’m going to show you the exact instructions that you need so that you can follow along.
Here are the 8 Steps to Create Your Dropshipping Store with Aliexpress & WordPress that I will be going through
- Choose domain and web hosting
- Install WordPress
- Setup WooCommerce
- Free shipping option only
- Install a Theme
- Setup WooDropship
- Create your products
- Customize your Online Store & Start Selling
I’ve got a bonus at the end of this tutorial. I’m going to order an item directly from my store. And then I’m going to fill the order using WooDropship. So that you can see how it semi-automates the fulfillment process.


Choose domain and web hosting
We will create an iPage account and set up a low-cost web hosting, and get a free bonus domain name. To get our web hosting and domain name we’re going to be using one of my favorite services online – iPage.
Now I recommended iPage some time ago in my last WooCommerce tutorial. Back then it cost just $23,88 to get a twelve month with hosting and domain name subscription.
Since then the price has been bumped up a little bit to $35,88 but it’s still easily the cheapest and best solution for beginners who want to get up and running fast. Because trust me I looked into a lot of other options and nothing else compared.
So I strongly recommend it to follow along and get web hosting and domain name from iPage for yourself, simply go to iPage’s homepage and create your web hosting account.
Let me show you the exact step-by-step process of creating an account with iPage.
So this here is the home page for iPage.

Remember, you can go to iPage to make your account and then click Signup Now on the screen. We’re going to slip to the domain name that we want to use for our store.

In this example I’m going to be using brewedtreatscofee.com. When you finish typing in your domain name of choice, click Check Availability. iPage will look to see if the domain name has already been registered. If it hasn’t, then you can register it.
I strongly recommend getting a .com domain name for your store, as it looks a lot more professional.
Okay, so if your domain name was available, you’ll be able to continue with the registration process. I’m blurring out my personal details.

Enter both your your Contact & Purchase Information
You’ll need to give your first name, last name, email address, phone number, street address, city, state, zip code and the country that you are based in.
Be sure your details are accurate as ICANN requires by law that your domain name is registered under your real contact details.
Next, you need to enter your Payment Details.
You can pay with either credit card, debit card or PayPal.

Again, I’ve blurred out my details for obvious reasons. Here at Purchase Information you’ll see it has by default it’s set to a 3 year hosting plan. Change this to be a one-year hosting plan.

At the time of this tutorial being created, it is just $2.99 a month for a one year plan.
Deselect the services that you don’t need
Now, I like having Domain Privacy, but if you want to save money, deselect it.
You’re scrolling down to Website Essentials. You’ll see that iPage are trying to upsell you additional extras.

First, let’s talk about the SSL certificate. If you want to accept payments with a credit card on your domain name like with Stripe, you need to purchase this.
Now, if you want to get an SSL certificate for your site, add it now. As it is the cheapest to ever get it with iPage. If you want to save as much as possible, then don’t take this. Because you can still accept payments with PayPal even if you don’t have an SSL certificate.
But if you want to get the SSL certificate, now is the time.
By default they have the Advanced Site Protection and Performance Accelerator plan selected. Deselect these as even if you want the feature, there are cheaper ways to protect your site.
Deselect the Daily Backup addition as you can do this yourself for free.
Once you deselect that, all of the additional extras iPage has added for you by default, you’ll see that the price has dropped to just $35,88.

So now you can click Check Out.
The following page is just a survey.

You can ignore it and click No Thanks.
This is another page trying to upsell extras to you.

Now on this page, you’ll see that the SSL certificate price has been bumped up to $39.99 per year.
SSL Certificate – To Buy or Not to Buy
As I said, if you want to get the SSL certificate, be sure to get it at the start of the checkout process when it’s the cheapest.
Now you just need to wait for iPage to speed up your store. This process took me less than a minute. While it’s setting up your store stay on this page. Don’t get concerned that it’s not working and click away if it’s taking some time to load.

All right, so when it’s done, go and click Log In.

On this page you will need to set up your account password. So go and create one.

It needs to be six characters long, contain an upper and lowercase letter, contain two numbers and have one special character like an exclamation mark.
Next, Set Up a Security Question.

The iPage support staff will use this to verify it’s you if you talk to them over live chat or phone. So create one that you will remember.
Next, you can spell out the referral information. You can say that you were referred by wpbackend.com but you really don’t have to.
Now just agree to the Terms of Service and click Save & Continue and that’s it.
We have created an account. On this page click on the Go Home button.

Doing this will take you to your iPage Control Panel which is where we need to be.

Stay here and don’t close up because we’ll need it for the next step.
Install WordPress
Okay so we’re back here on the Control Panel. Click on WordPress.

So to install WordPress we need to use the Mojo Marketplace.

So on this page just click on Continue Installation and now we need to select which domain name we’re going to install WordPress on.

Select the WWW. your domain name option like I’m doing here and do not click the one ending in .ipage.com. Keep the Directory section empty. Scrolling down I recommend skipping these plugins. I mean you can install them later if you choose to use them, but we don’t need them for now.
Skip the Upsells
Scrolling down some more you can see that they’re offering to let you pay to install WordPress for you.

But we’re literally about to install WordPress for free, so ignore this.
It may take a while to load. Do not click away.

This is perfectly normal that it takes some time. There isn’t anything wrong, just be patient.
Once it’s finished loading, it’s going to warn you that the install directory isn’t empty.

Don’t worry about this. Just click ‘I confirm that it is safe to overwrite any content in this directory‘ and click Next.
On next page you’ll be asked to fill out site title, create an admin email address and an admin username and admin password.

Fill out all of this information. This is going to be the login information for the Dashboard of your new site now. You don’t need to worry about the site title because we’re actually going to be deleting it later. So click Next once you’re finished.
Wait for the Install to Complete
It’s going to take a little while for WordPress to install. Again, don’t click away thinking that there is an error or a problem with your connection. Stay on the page and let it load and install WordPress on your new domain.
It should take about a minute or so to install. It may take longer depending on your internet connection, so again don’t get discouraged and click away.

Once this has been installed, I’m actually going to be showing you how to access your WordPress Dashboard by typing in the URL into your browser.
So now that WordPress has successfully installed, go to your browser, type in the domain name of your new store and at the end of it type /wp-admin and then hit Enter.

This will take you to the WordPress admin area of your site which is how we can go and edit it and make modifications to it.
So here on the page you just need to fill in the login details that you create earlier – your username and your password, and then once you’ve filled all that just go and click Log in.

When you’ve logged and go to this button and click I don’t need help.

And when you click that – that’s it! Step 2 is finished. It’s now time to move onto step 3.
Setup WooCommerce
You firstly need to open up the WooCommerce site. Start by clicking Get Started.

On this page you’ll need to create a WordPress account.

We’ll be using this WordPress account for the step when we install Mystile theme.
Make sure you use a real email address as in the next step we’ll need to find the verification email to verify our WordPress account before we can download Mystile.

Click on Sign Up.
On this page select that you don’t have a WooCommerce account and then click Continue.

Feel Free to Skip the Survey Questions
After this you’ll be taken to a series of questions. These questions are just a survey. If you want to help WooCommerce, you can fill out the survey. If you don’t want to, you can just skip any question by clicking Continue without giving any answers.
I personally don’t really mind answering questions though because the fact that WooCommerce is a free open-source plugin and I don’t mind supporting it.

So you see here that I’ve answered a couple of questions for them.
When it comes to this page go and select Auto install.

On this page go and type in the full URL address of your new store and then click Confirm.

When that’s loaded go and click Continue.

On the next page go and click Install Now.

This will complete installation of WooCommerce but we still need to Activate it and personalize it with a few things.

On this page go and click Activate plugin.
It may take a while for this to load but again do not click away. This is perfectly normal as this is a very large plugin to install.
All right, now we need to setup WooCommerce. Select Let’s go.

Don’t worry about this. It’s just explaining how it’s going to set up important pages like the Checkout for you.

Click Continue.

Select Your Store Location and Target Country
On this page you’re going to need to select what country your store is based in. I personally recommend just selecting your country of residence.
I recommend that you use United States dollars as your currency of choice since most of your customers will be based in the USA. You can select another one if you plan to set up a store to target a specific country like Britain. In which case you’d obviously select Pound.
Most people are going to be targeting United States residents, so coming down I recommend that you use Pounds as your units for measuring product weight as again most of your customers will be based in the USA. And because of that I recommend that you use inches.

After this click Continue.

Tax Setup Is Optional
Don’t worry about taxes right now. Just go for now and click Continue.
On the next page select the payments that you will accept.

Now everybody reading this tutorial should select PayPal.
You should be sure to put in your actual PayPal address. If you do not have a PayPal account I’d recommend to stop reading and create one up immediately.
I strongly recommend using Stripe for payment if you purchased an SSL certificate, but only if you did purchase one because you cannot use Stripe without it.
After you have selected your payments go and click Continue. And that’s it. WooCommerce has been set up.

Click Return to the WordPress Dashboard.
Now let’s move on to the next step.
Provide Free Shipping Option Only
In this step, I will show you how to add a free shipping option to improve sales and conversions.
I strongly recommend having one shipping option which is Free Shipping. You can easily offer this because Aliexpress shipping is usually free.
Anyway, sometimes you need to pay a little bit extra if you want to use a premium shipping service like ePacket but luckily this is usually just a couple of dollars or less. So it’s very easy to absorb into your product price.
Let me show you exactly how to do this.
Alright, so go to the Menu on the left and click on WooCommerce and then Settings.

Select the Shipping tab here.

Click on Add Shipping Zone.

For the Zone Name, the easiest thing to call it is Free Shipping. So type it in.
Next, you can choose to select regions to limit your Shipping Zone. This is entirely optional. Let’s say you selected United States. Now you’d only be offering free shipping to the United States.
But since Chinese suppliers from Aliexpress usually offer the ship free worldwide, I suggest leaving this blank and offering free shipping worldwide.
So after you’ve done that, scroll down and click Add Shipping Method.

From the drop down menu select Free Shipping and then click Add Shipping Method. And that’s it. We’re done.
I’ll show you how to set up free shipping since Aliexpress offers free shipping, but if you’d like you can create your own page shipping options as well. It’s entirely your choice.
All right, let’s move on to the next step.
Install a Theme
We need to verify the WordPress account that we’ve created in the previous steps.
So go to the email account that you created it with and click on the email feed from WordPress titled Activate followed by your site name.

For me, it said in the title Activate brewedtreatscoffee in the email.

Click the confirmation button and that’s it. You’ve confirmed your account.
It’s time to open up the Mystile website.

Now, I’ll have a link on how you can find this – scroll down and click Add to Cart. I know that this makes it sound like you’ll be purchasing something, but don’t worry – it’s completely free.

Click Sign In with WordPress.com.
On this page log in with your WordPress account that we verified earlier at the beginning of the step.

When you’re done, select Log In.
Fill Out Your Information
So on the next page you will need to fill out your information. You’ll need to fill out your first name, you will need to put your last name, you’ll need to give an email address and you also need to answer a survey question which asks how you will use the WordPress products.
It doesn’t matter what you put in here, just put anything. You need to give your address information and you will need to write down what your card of residence is, what city you live in, what region it is from and your postcode.
And again, don’t worry about being charged money. It’s entirely free.
Right just going through and filling out all of my details here. By default it has you set to receive newsletters. You can uncheck it here to not receive them and then just scroll back up and then go and click Purchase.

Download and Install Your Theme
Awesome! On this page we’re just going to download Mystile.

It’s a small file so it should be very fast to download. Once it’s downloaded, come back to the Dashboard for your new website, go to Appearance and click Themes.

On this page go and click Upload. Then click Upload Theme at the top of the screen.
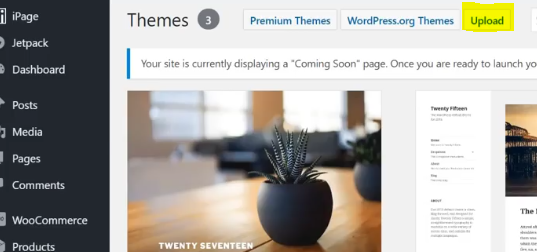
Here click Choose file, find where you saved the Mystile theme file on your computer and click Open.

Once you’ve done that click Install.

It may take a while for it to install on your site. Again, don’t click away and assume anything is wrong. This process should take less than a minute. It may take a little more depending on your internet connection.
On this page go and click Activate.
Once you’ve done that, you have successfully installed Mystile. It is now time to move on to the next step.
Setup WooDropship
We will now sign up for a free WooDropship account and install the WooDropship Chrome extension.
WooDropship is not only the apps that we’re going to use to greatly streamline the process of adding products to our store, but it’s also going to help us semi-automate the drop shipping fulfillment process.
Click on the Get Started For Free button.

On the next page you’ll need to create an account. You just need to enter your first name, your last name, you’ll need to create a username, create a password and enter an email.

Go to the Connect WooCommerce Store box and type in the URL to your new store and then click Connect Store.

On this page just scroll down and click Approve.

And that’s it! You’ve connected WooDropship to your site.
Install WooDropship Chrome Extension
Now we just need to go and install the WooDropship Chrome extension.
I’m going to open up a separate tab and copy and paste the URL to the Chrome extension and my browser.

Once you arrive here, just click the Add to Chrome button and then click Add Extension. When you do this successfully, you’ll see the WooDropship icon in the top right hand corner of your Chrome browser.

Okay, so now we need to verify it.
Go back to WooDropship and click on the little wheel icon.
![]()
Scroll down to the WooCommerce User Key. If you’re using a PC, highlight this, right-click it and click Copy.

Then go back to the WooDropship Chrome extension and go down to the User Key.

Paste in your key and then you just need to click Update. We’ve successfully created a WooDropship account plus we’ve added the Chrome extension and we’ve verified it.
It’s now time to move on to the next step which will also be the biggest and the longest step.
Add products from Aliexpress to your own store
Let me show you exactly how to add products directly from Aliezpress using WooDropship.
Ok, so I’m here on Aliexpress.
I’m going to search for products to add to my store. If you are not sure what to sell, you can browse around for ideas.
But for me, I know what I’m looking for. So I’m going to type in ‘self stir mug’ and then click enter.

So now Aliexpress has given me all of the results for ‘self stir mug’.
As you can see, there are lots. I want to figure out which seller is the most trusted. So I’m going to sort the results by Orders.

Now Aliexpress is showing these sellers selling this item in order of how many sales they make. This is a good way to order it because if the seller is making hundreds of sales a week, then you know they must be good at fulfilling orders.

This little ePacket tick symbol is showing up as a feature of WooDropship’s Chrome extension and it’s letting us know that this item has ePacket shipping available.
And on the flip side it’s showing us that ePacket is not available for this item. So if you wanted to use an ePacket shipping, you know not to sell this one:

Add and Aliexpress Item to Your Store
All right, so let’s add this item into our store. To do so, click this button.

This button is here because we have the WooDropship Chrome Extension installed. As you can see, it’s telling us that this item was successfully added to our WooDropship import list.

All right, let’s switch back to our WooDropship Dashboard. Go to the Menu, click Products and then click Import list.

As you can see, the self steer mug has been added to our list which is great.
Import Multiple Items At Once to Save Time
I’m going to go back and find another item to import, so that you can see how to import multiple items at once to save time.
I’m going to do a search for a ‘camera lens travel mug’. Once again, I’m going to order the results by number of orders the seller has made.
Scrolling down here you’ll be able to see that the WooDropship plugin is showing us which items have ePacket shipping available and which items don’t.
So I’m just going to go and add this one as an example to my store.

As you can see, it alerted me that it’s been successfully added. Switching back to my WooDropship import list, I’m going to refresh the page and here we go. You can see that it successfully added this product to my import last.

WooDropship is a bit different from Oberlo.
The WooDropsip team are adding new features constantly as it’s quite a new app, but at the time of this tutorial I personally found it easier to make deeper edits to each product listing manually and I’ll be showing you how to do so shortly.
So now I’m going to edit the title and description for each of these products. I’m going to paste in my new product titles that I’ve created for the ‘camera lens travel mug’ and paste in my description that I’ve already written as well.
Okay, so scrolling down now I’m going to do the same thing for the self stirring mug. I’m going to paste in a new product title that I’ve already created and I’m going to paste there a new product descriptions that are already written.
When you finish that, go and click Push To Store.

This may take a little while to load, so don’t click away. If it does, wait for it to load. When it successfully worked, you’ll get this little message saying Pushed.

Let’s scroll back up and push a camera lens travel mug to our store.
And we have ‘Product has been successfully pushed to your store’.
Create a New Product Category
Switch back to your WordPress Dashboard. I’m going to be showing you how to create a New Product Category.

But before I do, I’m going to go to the Products page to show you that our products have successfully been pushed to our store. And as you can see they have been successfully added.

I’m going to show you how to make deeper edits to the product listings. But before I do that, I’ll need to create a Product Category for these items that I’ve added.
Go to the Menu, under Products go to Categories.

Go to Name and type in your desired name for your category.
For me I’m going to type in ‘Coffee Mugs’.

Then just scroll down and click Add New Category to save it.
So scrolling back up, you can see that we’ve successfully added the new category called ‘Coffee Mugs’.

Go back to the Menu and click Products.

Click on Edit on a product you want to modify.

So as you can see, WooDropship has added in the product title and description that we wrote.

I’m going to use the formatting tools here to bold some of the text in the subscription. You can use the formatting tools to add lots of things such as images and bullet points.
So this item is what we would call a Variable Product.

That is because there are multiple variations of this mug. The seller for this mug is selling it in five colors: black, green, red, yellow and blue. I’m going to show you how to pick and choose which variations you want to sell and how to modify the price for each variation.
So scroll down to Product Data and click Variations.

Edit Product Variation Price
Firstly, I’ll show you how to edit the price for a variation of the mug using the black one as an example. Go here and click on this little triangle.
As you can see, there is the regular price and the sale price. You don’t need to include a sales price. It’s an optional feature. For this example though, I’ll add in the regular price of $19.99 and a sale price of $14.99. You now comeback and click this little triangle to close the black mug.

Now I’ll show you how to delete a Variation using the green mug as an example.
Remove a Product Variation
Just click on the Remove button and then click OK.

Okay so now the green mug is gone.
Make a Product Variation On Sale
I’m going edit the price of the red mug. Except this time I’m going to make it cheaper on sale than the black mug as you can set a unique price for each variation.

And at any point during us you can scroll down and click Save Changes to save your progress.
Now I’m going to edit the price for the yellow mug as well. I’m going to set it to be the same price as the black mug and then I’m going to click Save Changes.
For this example let’s just delete the dark blue mug.

As you can see we’ve now got only three of the original five variations for the mug.
Disable Reviews for Products
Next, click Advanced.
I suggest you uncheck Enable Reviews.
Select Full Width for the Product Page

After that scroll down to Mystile settings and click on the Full Width Layout like I’ve done through here.

Edit the Product Short Description
You can put whatever you like here. But personally, I think that the product listing looks best if you use bullet points.
The product short description sits at the top of the page next to the image gallery just like an Amazon listing. And Amazon has tested the conversions on their page and they’ve found that the layout looks great and converts great.

So I’d like to replicate it with mine and use bullet points for the section.
Change the Images of the Product
Let’s move on to the Product Gallery that WooDropshop has automatically imported for us. Here you can delete images by clicking on the red icon for an image.

I’m going to delete all of the images of the green and blue mugs since we removed them from our listing.
One final step – we now want to scroll up and select which product category the item belongs to.
For this example, I’m going to add this to the Coffee Mug Category.

Then just click Update and you are done. Now it may take a little while to load. Be patient and do not click away.
Let me switch to the product listing to take a look at it.

As you can see, it shows that this product is On Sale and the price is set to be between $13.99 and $14.99 since we set the red mug to be at $13.99 and the black and yellow ones be at $14.99.
Our image gallery is looking great.
And the images we deleted have been removed. A potential customer can come here and select the color of mug. As they do, the price changes.

Scrolling down you can see that our product description is here and the text that I bolded has been successfully saved.
This looks a lot like an Amazon product listing especially with the bullet points that I added in the Short Description Area.
Let’s switch back now to the WordPress Dashboard. I’m now going quickly edit the camera lens mug by doing the same thing as before.
I’m going to go to the Product listing and Edit it.

WooDropship has successfully added the Product Title and Description to the listing. Now I’m just going to go through and bold some of the ticks and my main product description just like they did before for the self stir mug.
This product is a little different. It has no variations so it is what is called a Simple Product. Now that’s a helpful thing since it makes it much easier to edit it. I’ll show you how to edit the pricing for a simple product compared to a product with variations.
So go to Product Data and the general tab you’ll see that there is a Regular Price and a Sale Price. For this tutorial, I’m going to put in a regular price of $17.99 and remove the Sale Price, so that you can see a product listing not on sale.
Next click Advanced and then uncheck the Enable Reviews box. Then scroll down to Mystile settings and then click the Full Width Layout.
Now go to the Product Short Description.
Again, I recommend adding in bullet points. I’ve already written some website copy, so I’m just going to be pasting it into this box. And using the formatting tools to turn it into bullet points.
So again, you can edit the product gallery. I’m actually going to leave the images though as they are fine.
Now I’m just going to scroll back up and go again to Product Categories. I’m then going to select ‘Cofee Mugs’ and then I’m going to click the Update button and let the product load. I’ll then open it up so that you can take a look at it.

It’s done. Let’s open up the product listing now and take a look.
Let’s Check the Results
As you can see, there is no sale badge next to the price. The image gallery is looking great. We can switch between images and zoom in on images that are large enough to do so.
Scrolling down you can see that the product description is in here along with my bolder text.
Now coming to the bottom, here you’ll see that there is now a Related Products Section automatically pulling my self stirring mug since it’s in the same category and this is great as it helps to up sell more product to a customer since they might want them as they’re related.

Opening up the product listing for the self stir mug, scrolling down you’ll see that the travel lens coffee mug has been added as a Related Product to this listing as well.
Now I’m going to add and additional category and called ‘Coffee Spoons’ with six other products.

All right I’ve now added the new product category ‘Coffee Spoons’ plus six other products. It’s now time to move on to the next step step.
Customize your online store
Edit the Sidebar of your Store
I’ve come here to the Cart page to show you what our side bar on the right looks like.

Right now as you can see it is very very ugly and designed like a blog sidebar. But we don’t have a blog, we have a store.
So let’s change the sidebar.
Go to the Dashboard, then go to Appearance in the menu and click Widgets.

Now what we want to do is delete all of the widgets under the Primary Sidebar and to do this it’s really simple. Click the little triangle next to each one and then click Delete.

It’s that simple. Just come and delete all of these widgets just like that. We’re going to be replacing these with a single widget.
That’s going to highlight the products that we added in the previous steps instead and that’s going to make this sidebar look a lot nicer and a lot more professional.
Add the WooCommerce Products Widged to Your Sidebar
Once you’ve deleted them, scroll down until you find the widget titled WooCommerce Products.

Click the widget and then while still holding it drag it all the way to the top of the screen and then drop it under the Primary Sidebar. Then keeping all of the default settings as they are. Simply click Save.

I’m going to switch back to the Cart page, and refresh it so that you can see our new and updated sidebar.
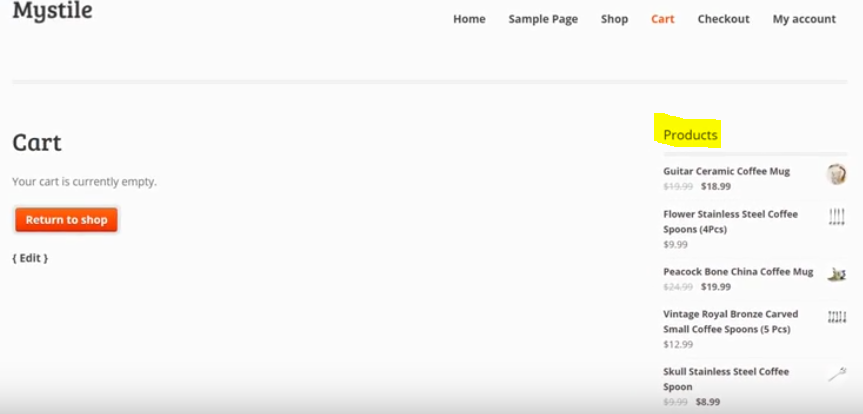
Your updated sidebar will now automatically show you the five latest products in our store.
It’s now time to move on to the next.
Add a Custom Logo
I’m here in the Product listing for the travel lens coffee mug.
On the top left hand corner you can see the Mystile logo.
![]()
We are now going to change this to be our own logo.
Go to the Dashboard and scroll down to Settings and then click General.

On this page go and delete the Site Title. Next, delete the site Tagline.

Scroll down and click Save Changes.
Go to Mystile in the menu and click it.

Go to the Custom Logo and click the Upload button.
![]()
Click Upload File.

I’m dragging and dropping my logo.
Next, click on the Use Image as Custom Logo button.
![]()
Now you need to uncheck the box next to Text Title.

Then uncheck the box next to Site Description as well. Then just scroll down the page and click Save Changes.
That’s it! We’ve now successfully uploaded a custom logo.
If you want to get a custom logo made cheaply, a good place to get one is Logomakr.com.
Change the Custom Footer of Your store
If we come to the footer for our store right now, you’ll see that there is this ugly ‘Powered by WordPress’.
![]()
We’re going to get rid of it right now.
So just switch back to your Dashboard. On the menu, click Mystile.
On this page, click Footer Customization.

Scroll down the page. Now come to this check box and tick it.

Now we can replace that Powered by WordPress badge with our own content here. You can type there whatever you’d like to, replace it with in this box. Alternatively you can keep it blank like I will for this example.
Then just click Save Changes.
I’m going to switch back and refresh the page and as you can see it’s now been removed from our footer.

Here’s an alternative way to get rid of the ‘Powered by WordPress’ text.
Create a Custom Home Page for Your Store
So as you can see our homepage is currently empty.
![]()
Let’s change that.
Go to the Dashboard on the menu select Pages and then click Add New.

I’m going to type Homepage for the page title.
Then click Publish. Don’t worry, we will customize it more very soon.
Now go to Settings and click on Reading.

Change Your Store Front Page
Go to Front Page Displays and tick A Static Page. In the Front Page drop-down menu select Homepage which is the page we just created.

Then go down and click Save Changes.
Now come back to the menu and select Pages.
As you can see, the home page we made earlier has been set to be the Front Page.

Now click Edit. The first thing I recommend doing is deleting this title.
Otherwise it will show up as a title on our home page and it will look pretty ugly. Next, go down to the Content section.
Add A Custom Banner to Your Homepage
I’m going to click Add Media and then upload a homepage banner. I recommend you also make a banner and add it to the homepage as I think it’d look nice and professional.

Once uploaded go to these settings.

Set the Alignment to be Centered and change the size to be Full Size. Then click Insert Into Page.
As you can see, my banner is 1250 pixels by 250 pixels. This is a good banner size to create.
I’m going to insert some content that I’ve already brushed in advance. I’m going to highlight the title and then come and use formatting tools to use the header settings to turn it into an H2 header.

Display More Products on Your Home Page With the Help of a Shortcode
Underneath this I’m going to paste in what is called a shortcode. This is a little piece of code that will WooCommence and WordPress understand and it lets us create cool features on our site.
Typing in this shortcode means that I’m going to have the latest eight products show up on this page and I’ll show you what it looks like. I recommend that you add this exact shortcode to your home page:

WordPress HTTPS / SSL Installation & Maintenance Service
$50.00
Add to cart
WordPress Staging Installation Service
Read more
WordPress Domain Change Service
Read moreWordPress Installation Service
Read more
DNS Setup Service
Read more![]()
WooCommerce Optimization Service
Read more
Improve WordPress Speed Service
Read more
WordPress Hack Cleanup Service
Read more
You can just copy and paste in this shortcode.
After this, scroll down to Mystile settings and select the Full Width page Layout and then just scroll back up and click the Update button to save the changes we’ve made to our new home page.

And that’s it. We’ve now updated our home page. I’m just going to switch back to our store now so that you can see what our new home page looks like.
It now includes our banner, it has the content that we added and it has our most recent products previewed on it. It’s a nice simple professional homepage.
We can move on to the next step.
Create an About Us Page for Your Store
Go to the Dashboard on the menu, go to Pages and then click Add New.
For Title, name it About Us like I’ve done here.

Go ahead and add some text about your new store. I’m going to copy and paste a blurb that I’ve already written.
Next, I’m going to add a picture and edit it. To do that, I’m going to put my cursor where I want the image to go and then click Add Media.
I’m just going to upload the picture to mysite.
This is very important. Scroll down here next to Alignment, select the dropdown menu and click Left.

I’m going to keep it on Full Size and then I’m going to click Insert Into Page.
You can see that it’s added the image and it’s to the left. Now click Publish.

Alright, we’re done!
Let’s open it up and preview what the page looks like.

It is a nice simple About Us page. You can use this method to add any page that you like.
Create a Custom Menu for Your Site
Here is what our current menu looks like.

Obviously it has pages we want removed. So let’s go in and create a professionally looking menu.
Go to your Dashboard, go to Appearance and click on Menus.
Then go to the Menu Name, type in ‘Main Menu’ and then click the blue Create Menu button to the right.

Now go to this box.

We’re going to tick About Us, the No Title page which is actually our Homepage, My account, Check out, Cart and Shop. And then click Add to Menu.
Let’s rename some of these menu items. Go to the No Title menu item and then click the triangle next to it.

Rename the navigation label as Home and then click the triangle to close it.
Go to Shop, click the triangle next to it to open it and rename the navigation label as Products, then click the triangle to close it.
Change the Order of Your Store Menu Items
We’re going to move these menu items around to a different order. To do so click Home, hold it and drag it to the top of the menu items and keep doing this like until the menu is ordered.

Add a Sub Menu to the Main Menu of the store
Now we want to add a Sub Menu to the Products tab so when people put the cursor over it a sub menu containing the different categories of our products will appear.
Go to Products, then go to Categories and open this page up as a separate tab.

Go to the first category. If you’re using a PC you can right click the View button and then click Copy Link Address.

Now switch back to the Menu page that we still have open and click Custom Links.
Paste the URL into this box and in the Link Text put the name of what this category is. In this case, I’m going to put Coffee Mugs and then click Add to Menu.

Repeat this for all of the categories you have in your store.
So for me I’m going to repeat this process to Coffee Spoons. If you have a Mac, you can still do this – just copy and paste it was the Mac copy and paste command.
Once you’ve added your categories, pick one up and drag it so it stays under Products but is indented like I’ve done here with the Coffee Mugs a menu item.

It should say that it is a Sub Item.
Repeat the same for your other categories. Once you’ve done that go down to Menu Settings.

Tick the Primary Menu option and then click the blue Save menu button. And that’s it! We are done.
I’m going to switch back now and refresh the page so that you can see what the menu looks like and here it is.

You can see that our submenu items are working great. We’ve now just got one final step to go. We’re almost there now.
Make Your Store Live and Start selling
This is super easy to do. We’re almost finished. Congratulations on staying with me this far!
We just need to remove this Website Coming Soon page. When you do, people will be able to go to your storefront, see it and buy items.
To do so, go to the admin Dashboard, then just click this button here and when you do that it’s done. Simple.

When people come to your store, they will see the store and not the Coming Soon Page.

Congratulations on completing all steps! You now have a semi-automated dropshipping store and that is it.
We are done. Well done on staying right to the end of this tutorial.
Purchase an Item From My Store (Bonus Step)
As I promised I am now going to go purchase an item from my store and then fulfill it using WooDropship so that you can see how it semi-automates the drop shipping fulfillment process.
I purchased this Guitar Mug.

Now I’m going to fulfill the order with WooDropship. Through this I have come to Pending Orders. I’m going to click Fulfill Order.
Now what WooDropship is doing is adding item into my cart and typing the customer address to me automatically.


Now I’m not pushing any buttons here. It’s doing all for us without any input and this is a huge part of what makes WooDropship an amazing app for creating a semi-automated store.
As it is semi-automating the system and performing and it is a huge time saver.

So it’s now that it’s finished, I can scroll down and select the Shipping I want to use. ePacket isn’t available for this item, but if it was, I would have probably selected that.
Leave a Custom Order Note
Next, I’m going to go and leave a message as so the merchant doesn’t any advertising or invoices with the order.

I recommend adding a message like this as well if you are also using this as a store to dropship you can then select how you want to pay. Now I’m going to be paying with a credit card I already have them filed, then you just click Confirm & Pay.
When you do that, you’ll be taken back to WooDropship.

Switching back to Aliexpress and confirming that the order went through.

For me I had to confirm my credit card. Sometimes you’ll need to do this, sometimes you won’t. It’s not WooDropship’s fault, it’s just the quirk of Aliexpress.
That’s it, we’re done! We successfully fulfilled the order with WooDropship.
With a little bit of work we have created our own semi-automated Aliexpress dropshipping store using WooCommerce and WooDropship.
To get started with step 1, simply go to www.iPage.com and create your account with them.
If you like this tutorial, I’d appreciate your comments below.
Cheers!
Great article. Thank you for all the details, details are so important.
I have a wp – woocommerce, and siteground (gogeek) I am lost. Would you put a detail tutorial together for me (and everyone else like me needing help)?
I need a fully automated dropship ecommerce store.
List any free tools and such which are best for my needs.
If you know of another hosting service [less expensive] besides what I have (siteground – gogeek) I would be so grateful.
Again thank you for such a great article, keep up the great work.
Hi Mich and thanks for your comment. SiteGround is a good choice. They provide reliable hosting service and knowledgeable but also very very busy support.
However, I would go with Bluehost because of the following reasons:
With the similar plan from Bluehost you get a lot more actually. In my opinion, the ones worth considering in your case are:
In that case I would go with 3 years Bluehost Prime for $196.20 as you will be able to enjoy your discounted price for the next 3 years.
Now, you’re absolutely right and paying $89 for 3 months GoGeek hosting doesn’t sound like a good deal.
If I were you I would definitely go with Bluehost or even with InMotion Hosting’s Pro Plan which is currently at $8.99/month.
Let me know if I can help you with anything else. Cheers!
Thank you. I will check these out.
If I have anymore questions I will be sure to turn to you.