Last updated on June 26th, 2022 at 11:41 am
Sometimes it happens that you make changes on your Prestashop site, but the changes don’t seem to be reflected when you refresh your page. Luckily, there’s a solution for this issue, and it’s related to the so-called Smarty cache in Prestashop. In this tutorial, I will show you how to clear Prestashop cache both manually and automatically.
To clear Prestashop cache automatically,
- Log in to your Admin backend.
- Go to ADVANCED PARAMETERS -> Performance.
- Choose Force compile.
- Click on the No button in the Cache section.
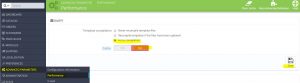
- Finally, click on Save.
It will take some time for your site to clear the cache. Once done, refresh your page to see your latest modifications on the site.
To clear Prestashop cache manually,
Prestashop version 1.6.x and after uses Smarty for caching data. So, the cached data can be found in the following directories of your hosting server:
cache/smarty/compile
cache/smarty/cache
img/tmp
You can access these files through cPanel -> File Manager and by browsing to you Prestashop site’s installation folder.
Alternatively, you can reach these directories via FTP using the correct login credential for that specific folder.